How to Set Up a Thank You Page in WordPress (6 Steps)
 Stacey Corrin
Stacey Corrin
Stacey Corrin
 John Turner
John Turner
John Turner


TL;DR: How to Set Up a Thank You Page in WordPress A thank you page confirms the action your visitor just took and keeps them engaged instead of sending them to a dead end. Here’s the fastest path to a working one:
- Install SeedProd: Download and activate the plugin, then verify your license key.
- Choose a template: Browse the thank you page template library and launch one with a single click.
- Customize your design: Use the drag-and-drop editor to add your headline, countdown timer, or opt-in form.
- Connect your email list: Link your email marketing service so new subscribers get added automatically.
- Configure settings: Set up SEO, analytics, and any tracking scripts you need.
- Publish and redirect: Go live, then redirect giveaway entrants or form submitters to your new page with RafflePress or your form plugin.
After someone submits your form or enters your giveaway, where do they go? Most WordPress sites drop visitors on a generic confirmation message, or worse, a blank page. That missed moment is when their interest is highest.
A good thank you page does more than say “thanks.” It gives you a chance to share a coupon, suggest related products, or invite people to stay connected while their interest is at its peak.
In this guide, I’ll walk you through exactly how to create one in WordPress step by step. By the end, you’ll have a working thank you page set up and ready to go.
What Is a WordPress Thank You Page?
A WordPress thank you page is a confirmation page that appears after someone completes an action on your site: submitting a contact or signup form, completing a checkout in WooCommerce, or entering an online giveaway with RafflePress. Instead of leaving visitors at a dead end, it acknowledges what they just did and guides them toward the next step.

What to Include on Your Thank You Page
I’ve seen a lot of thank you pages, and the ones that actually move the needle share the same five elements. Think of this as your starting checklist:
- Confirmation message: Tell visitors exactly what just happened. “You’re in — check your inbox to confirm your subscription.”
- Next step CTA: Give them one clear action to take. A download link, a product page, or an invite to join your community.
- Social follow buttons: Moment of highest intent. This is when a new subscriber is most likely to follow you.
- Related content link: Keep them on your site. One relevant article or resource keeps the conversation going.
- Coupon or reward: For giveaway entrants especially, a discount code or bonus entry reward is a strong reason to take the next step.
Free: Download Our Giveaway Playbook
Templates, prize ideas, and promotion strategies in one guide.
Why Your Thank You Page Matters
Most site owners skip the thank you page entirely, or leave it as a generic WordPress confirmation. That’s a real cost.
- Confirms the action: Visitors want to know their form submission, purchase, or entry actually went through. Without a clear confirmation, you’ll get repeat submissions and support emails.
- Keeps momentum going: Intent is highest right after someone takes action. A thank you page is your best shot at a second conversion while they’re still engaged.
- Makes conversion tracking possible: Setting your thank you page as a goal in Google Analytics lets you measure exactly how many people completed a form, purchase, or giveaway entry.
- Grows your email list: A well-placed opt-in on your thank you page reaches visitors at the moment they’re most likely to say yes to more from you.
Here’s how to set one up in under 15 minutes.
How to Set Up a Thank You Page in WordPress
The easiest way to add thank you pages to your WordPress site is with a drag-and-drop page builder plugin. For this tutorial, I’ll use SeedProd, the drag-and-drop website builder for WordPress.

With SeedProd, you can build any WordPress page, including thank you pages, without touching code. Hundreds of pre-made templates mean you can have a live page in minutes.
Check out the steps below to learn how to set up a thank you page in WordPress with SeedProd.
Step 1. Install and Activate SeedProd
The first step is to visit the SeedProd website and download the plugin to your computer. For this guide, I’ll be using the pro version for its advanced features.
After downloading the plugin, you’ll need to upload it to your WordPress dashboard and activate it. If you need help with this step, you can see this guide on installing a WordPress plugin.
Once the plugin is active on your website, navigate to SeedProd » Settings and enter your license key details. You can find this information in the downloads section of your SeedProd account.
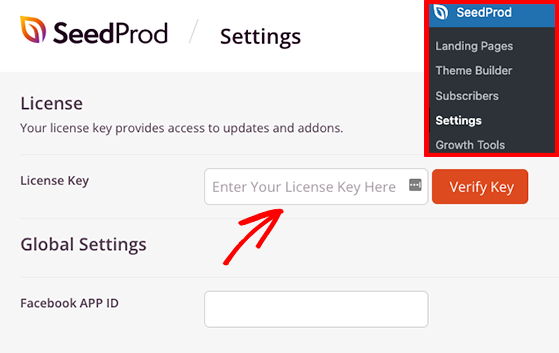
Now go ahead and click the Verify Key button to unlock your premium features.
Step 2. Choose a Thank You Page Template
For the next step, navigate to SeedProd » Landing Pages, and click the Add New Landing Page Button.
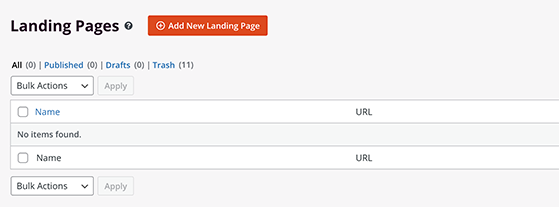
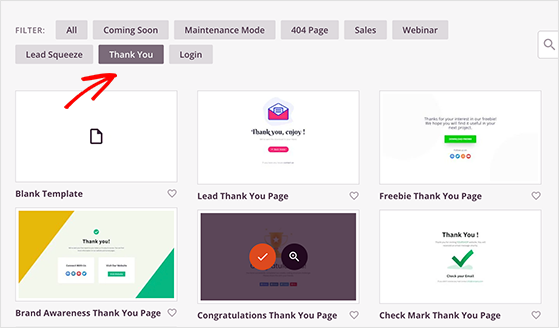
Clicking the button will open the library of landing page templates for you to browse.
Click the Thank You filter at the top to see thank you page templates. Then, when you find a design you like, click the checkmark icon to launch it.
In the following popup window, you can enter your thank you page name and URL.
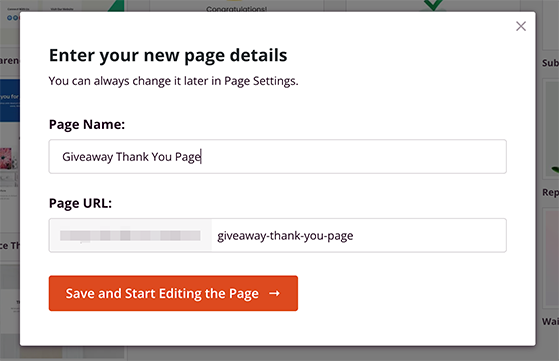
From there, click the Save and Start Editing the Page button to launch your template in SeedProd’s visual editor.
Step 3. Customize Your Thank You Page Design & Content
On the next screen, you’ll see a drag-and-drop interface where you can customize your thank you page design.
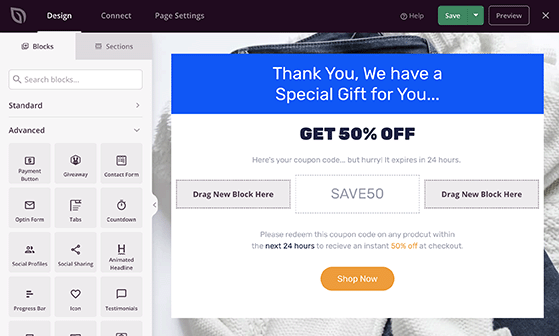
On the left is new page content called WordPress blocks and page sections that you can drag onto your page. On the right is a live preview of your design.
Clicking any page element lets you customize its contents. For example, clicking the headline element opens its settings in the left panel, where you can add your own custom headline.
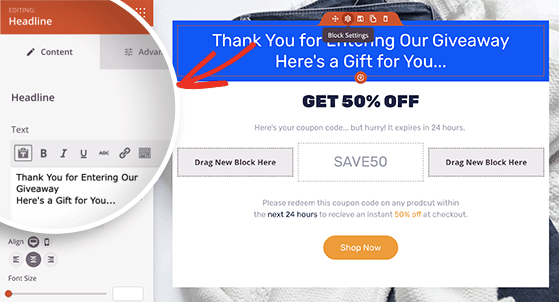
Two customization options that make the biggest difference:
- Block templates: Many SeedProd blocks include pre-styled templates you can apply with a single click. The countdown timer block, for example, has multiple designs built in.
- Global Settings: Click the Global Settings icon to adjust your background image, color scheme, and typography across the entire page at once.
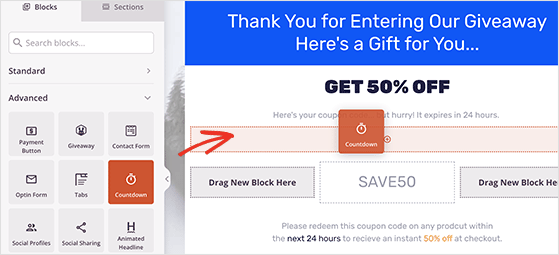
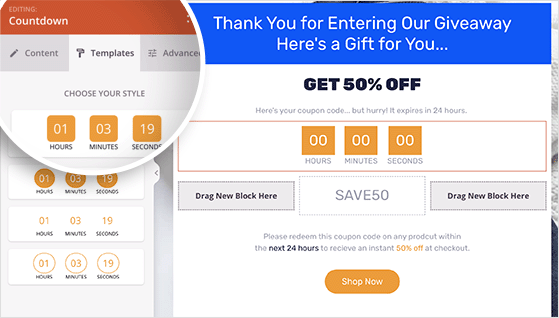
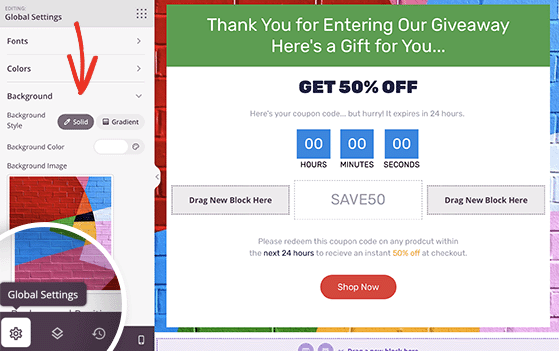
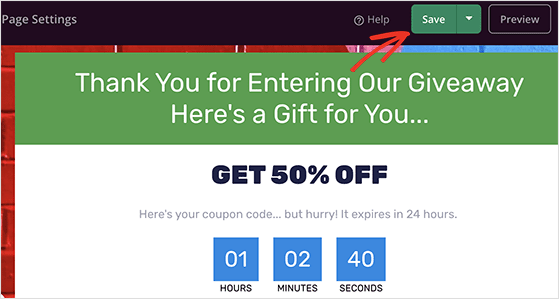
Once you are happy with how your thank you page looks, click the Save button in the top-right corner.
Step 4. Connect Your Email List
If you’ve used SeedProd’s Opt-In Form widget on your thank you page, you’ll need a way to add new subscribers to your email list automatically.
Luckily SeedProd offers direct integrations for popular email marketing services. It also has integrations for Google Analytics and Zapier.
To integrate your preferred email marketing service, click the Connect tab at the top of the page, then choose your email provider from the list.
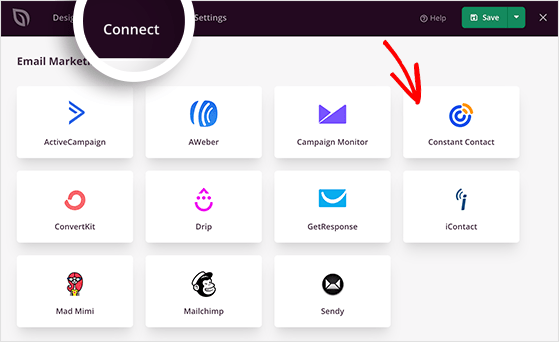
Follow the on-screen instructions to authorize your connection and link your email list.
Step 5. Configure Your Thank You Page Settings
The next step is to adjust your thank you page settings to get more conversions. Click the Page Settings tab at the top of the screen, where you’ll see several options, including General, SEO, Analytics, and Scripts settings.
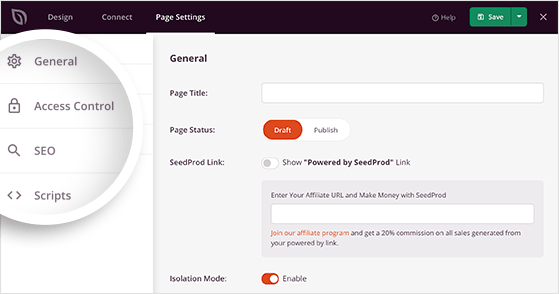
These sections let you tweak things like:
- Your thank you page name
- On-page SEO settings
- How you monitor your landing page performance
You can also enter custom scripts to your header, body, and footer sections, like your Facebook tracking pixel.
Remember to click the Save button after configuring your settings.
Step 6. Publish Your Thank You Page in WordPress
Now that your thank you page is complete, it’s time to make it live on your WordPress website. But first, let’s make sure the page is mobile-responsive.
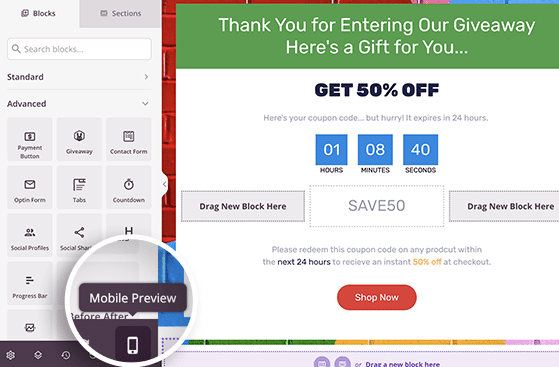
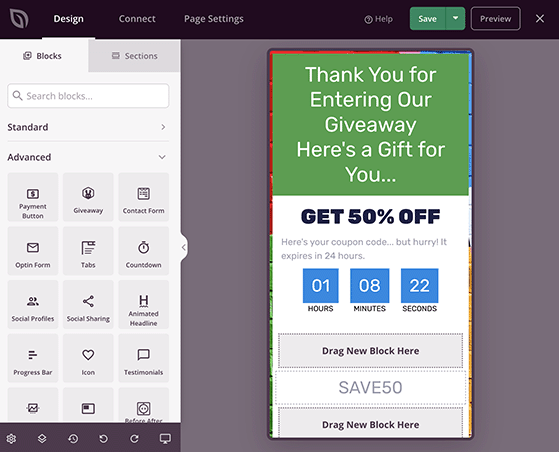
To preview your page on mobile devices, click the Mobile Preview icon at the bottom-left of your screen.
And if anything looks wrong, you can edit the layout until it’s perfect.
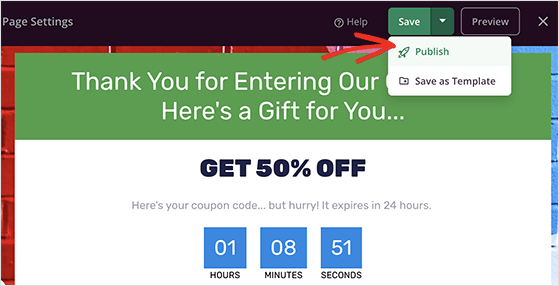
When you’re happy with how everything looks, click the dropdown arrow next to the Save button and click Publish.
Now you can view your page to see it in action.

Optional tip: If you don’t want your thank you page publicly accessible — say it contains a coupon code — you can set the WordPress page visibility to Private. Only visitors redirected from your form or giveaway will see it. Find this option under Page Settings » General in SeedProd.
Setting Up a WooCommerce Thank You Page
If you’re running a WooCommerce store, the setup is slightly different. Here’s what you need to know.
WooCommerce has a built-in order confirmation page — the “Order Received” page — that shows automatically after checkout. It confirms the order, lists the items, and gives the customer their order number.
That page works, but it’s not optimized for next steps. To redirect customers to a custom SeedProd thank you page instead, you have two options:
- Use a redirect plugin: A plugin like WooCommerce Order Thank You Page lets you set a custom URL for the post-checkout redirect. Point it to your SeedProd page.
- Use SeedProd’s WooCommerce integration: SeedProd includes WooCommerce blocks — checkout, order details, cart — that you can use to build a fully custom order confirmation page. Set it as the redirect destination under WooCommerce » Settings » Advanced » Page Setup.
Either approach gives you a custom post-purchase experience that the default WooCommerce page can’t match.
Bonus: Redirect Giveaway Participants to Your Custom Thank You Page
After someone enters your giveaway, they’re warm. Their interest is at its peak.
Sending them to a custom thank you page at that moment gives you a real shot at a second conversion. You can offer a discount code, invite them to follow you on social, or send them to a related post while they’re still paying attention.
I’ll show you how to redirect entrants after they enter your RafflePress giveaway. First, follow these instructions on creating a giveaway with RafflePress.
Next, go to your giveaway’s Settings page and click the Success Redirect heading.
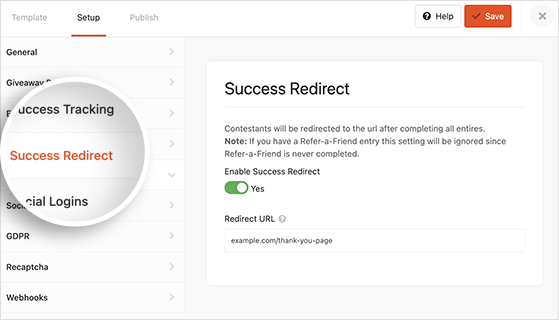
On this screen, you’ll need to click the Enable Success Redirect toggle to the on position. Then paste your thank you page URL into the Redirect URL box and click Save.
Now anyone that enters your giveaway will go to your thank you page automatically.
FAQs on Creating Thank You Pages in WordPress
How do I redirect users to a thank you page after form submission in WordPress?
The method depends on your form plugin. In most WordPress form plugins — including WPForms — you’ll find a redirect option under the form’s Confirmation settings. Set the confirmation type to “Redirect” and paste in your thank you page URL.
If you’re using SeedProd’s Opt-In Form block, the redirect is built into the form settings panel in the visual editor. For giveaway entries, use RafflePress’s Success Redirect option under your giveaway settings.
Can I use a thank you page to track conversions in Google Analytics?
Yes — and it’s one of the cleanest ways to do it. Every visit to your thank you page represents a completed action, so you can set the URL as a conversion goal in GA4.
In GA4, go to Admin » Conversions » New Conversion Event and create an event that fires when someone visits your thank you page URL. If you’re using MonsterInsights, you can set this up directly inside your WordPress dashboard without touching GA4 manually.
How do I set up a WooCommerce thank you page?
WooCommerce has a default “Order Received” page that shows after checkout, but you can replace it with a custom page. Build your custom thank you page with SeedProd, then go to WooCommerce » Settings » Advanced » Page Setup and update the “Thank You” page to your new URL.
Alternatively, a plugin like Custom Thank You Pages for WooCommerce gives you more granular control, including different thank you pages for different products or order values.
Should a thank you page be noindexed in WordPress?
In most cases, yes. Thank you pages are confirmation pages meant only for visitors who just completed an action — they’re not useful to someone arriving from a search result. Indexing them can also inflate your analytics by counting organic traffic as conversions.
To noindex a thank you page in WordPress, open the page in the SeedProd editor, go to Page Settings » SEO, and check the “Noindex this page” option. If you’re using AIOSEO, you can set the same option on the WordPress page itself under the AIOSEO meta box.
You now know how to set up a thank you page in WordPress and redirect users to it after entering your RafflePress giveaway.
Ready to dive in?
Get started with RafflePress today.
If you enjoyed this tutorial, you might also like the following marketing guides:
- How to Add WordPress Push Notifications to Your Website
- Best WooCommerce Plugins to Skyrocket Your Sales
- Best Digital Marketing Campaigns to Boost Leads
If you liked this article, please subscribe to our YouTube Channel for RafflePress video tutorials. You can also find us on Twitter and Facebook.

