How to Create an Online Contest in WordPress (Step by Step)
 Stacey Corrin
Stacey Corrin
Stacey Corrin
 John Turner
John Turner
John Turner

TL;DR: How to Create an Online Contest
Running a contest is one of the fastest ways to grow your email list and reach new followers.
Here’s the short version:
- Choose your contest type – sweepstakes, photo contest, UGC, voting, or skill-based, depending on your goal.
- Set your goal and pick a prize – tie the prize to a specific outcome and make sure your audience actually wants it.
- Write clear rules – cover eligibility, entry methods, and how you’ll pick the winner.
- Build it with RafflePress – set up your contest in WordPress in under 30 minutes, no coding needed.
- Promote where your audience is – email, social media, and your website all working together.
- Follow up with all entrants – announce the winner and email everyone else to turn participants into long-term subscribers.
This guide walks you through every step, from choosing the right contest type to following up with entrants.
- What Is an Online Contest or Giveaway?
- Types of Online Contests: Which One Fits Your Goal
- How Do You Create an Online Contest in WordPress?
- Step 1: Plan Your Budget and Timeline
- Step 2: Set a Goal That Drives Results
- Step 3: Pick a Prize People Actually Want
- Step 4: Write Rules That Avoid Legal Trouble
- Step 5: Build It Fast with a WordPress Plugin
- Step 6: Promote It Where Your Audience Hangs Out
- Step 7: Announce Your Winner to Boost Credibility
- Step 8: Track What Worked (and What Didn’t)
- Which Contest Should You Run? Ideas by Business Goal
What Is an Online Contest or Giveaway?
An online contest or giveaway is one of the fastest ways to grow your business online. You offer a prize in exchange for an action, like joining your email list.
While often used interchangeably, there is a key difference between the two. A contest usually requires skill or effort, like submitting a photo or writing an essay.
A giveaway (or sweepstakes) relies entirely on luck. Winners are picked randomly from a pool of entries, making it easier for people to join.
Types of Online Contests: Which One Fits Your Goal
Not all online contests work the same way, and choosing the right format makes a real difference in what you get out of it.
| Contest Type | How It Works | Best For |
|---|---|---|
| Sweepstakes | Random draw from all valid entries | Email list growth, high participation |
| Photo or Video Contest | Entrants submit visual content, and a judge picks the winner | User-generated content, visual brands |
| UGC Contest | Entrants create content featuring your product | Social proof, brand awareness |
| Voting Contest | Community votes on submitted entries | Engagement, community building |
| Skill-Based (Essay) | Written submissions judged on quality | High-intent leads, smaller niche audiences |
Sweepstakes are the most common choice for small businesses because they’re easy to enter and pull in the most participants. If you want online contest ideas that generate content or build community, a photo contest or UGC contest is worth the extra setup time.
Free: Download Our Giveaway Playbook
Templates, prize ideas, and promotion strategies in one guide.
How Do You Create an Online Contest in WordPress?
Creating an online contest in WordPress is a simple process:
| Step | What you’ll do in WordPress |
|---|---|
| 1 | Plan your goal |
| 2 | Install the RafflePress plugin |
| 3 | Set your prize |
| 4 | Choose entry actions |
| 5 | Design the contest widget |
| 6 | Publish it on your site |
| 7 | Promote it so people enter |
Follow the steps below to launch your contest fast.
Step 1: Plan Your Budget and Timeline
Before you dive into goals and prizes, outline your budget and timeline. A clear plan keeps your contest affordable and stops surprise costs later.
Your contest budget doesn’t need to be complicated, but you should account for these key costs:
- The Prize: The total value of what you’re giving away.
- Advertising: Any budget for paid ads on social media or search engines.
- Contest Tool: The cost of the plugin you’ll use, like RafflePress.
Choosing the right duration is crucial. A contest that’s too long can lose momentum, while one that’s too short might not get enough entries.
Here’s a simple rule of thumb:
- For simple giveaways (like, share, or subscribe): 1–2 weeks is perfect. This creates urgency and encourages immediate action.
- For skill-based contests (photo or video submissions): Allow 3–4 weeks. This gives participants enough time to create and submit quality entries.
Step 2: Set a Goal That Drives Results
Set a clear goal before you launch anything else. A specific goal shapes everything after it, from the prize you choose to the entry actions you set.
Match it to your wider business and marketing plans.
Most businesses aim for these common giveaway goals:
- Bring more visitors to their website
- Create excitement around their brand
- Grow their email subscriber list
- Build stronger customer relationships
- Boost their product sales
- Get more social media engagement
- Collect customer photos and videos
- Learn which products customers love most
For example, say your main goal is more social media engagement. Give your social follow and visit actions a higher point value so people prioritize them over the rest.
If you’re not sure what type of giveaway to run, here are winning giveaway ideas to help you decide.
Step 3: Pick a Prize People Actually Want
People love free stuff, but a weak prize kills entries before they start. If you want a viral giveaway, pick a grand prize your audience genuinely wants.
Some of the most popular giveaway prize ideas include:
- Money
- Gift cards or gift certificates
- Free products/services
Studies show that contests offering gift cards or cash receive significantly higher engagement than branded merchandise. Pick something that motivates them to act.
Here’s a list of exciting giveaway prize ideas to help you decide.
You’ll want to ensure that your contest prize is relevant to your target audience and your brand. For instance, Supreme House Fitness offered a fitness package to the lucky winners of their social giveaway.

Choosing a prize that you know your target audience would love will help you attract more contest entries from your ideal customers.
Step 4: Write Rules That Avoid Legal Trouble
Every successful giveaway needs clear, simple rules. Your rules protect both you and your participants while keeping things fair for everyone.
It’s also good to know that the legal rules for a skill-based contest can be more complex than for a random giveaway. Since this guide focuses on giveaways, the process stays simpler.
Here’s what your giveaway rules should cover:
- Prize details and how they’ll be delivered
- Who can enter (age limits, location restrictions)
- How to enter (entry methods and requirements)
- Contest dates (start and end times)
- How winners will be chosen and notified
- Entry limits (one per person, daily entries, etc.)
Always reference local regulations, such as FTC guidelines in the US or GDPR in Europe, to ensure full compliance. This builds trust and keeps your business safe.
It’s also important to check the promotion guidelines for any social media platforms where you’ll be sharing your contest. Sites like Facebook and Instagram have their own specific rules for running giveaways.
Make your rules easy to find and understand. For example, The Stem UK clearly states in their contest post when their giveaway ends, how they’ll pick and contact winners, and who can join.

Want to save time? Most contest tools like RafflePress include a rules template you can customize for your needs.
Want help with the legal side? Use this guide to write giveaway rules like a pro.
Step 5: Build It Fast with a WordPress Plugin
You have a few options for running an online contest: social media platforms, third-party contest tools, or a WordPress plugin hosted on your own site.
Social media platforms limit what you can customize. Third-party tools often add their own branding and hold your participant data.
A WordPress plugin keeps your data inside your own site from day one.

I use RafflePress for this. It’s a WordPress contest plugin that lets you build a giveaway landing page, set entry actions, and connect your email list, all without touching code.
Here’s how to set it up.
Create a New Contest
First, you’ll need to download the RafflePress plugin. Here’s a step-by-step guide on installing WordPress plugins if you need help.
After installing and activating the plugin, hover over the RafflePress icon and click Add New to create a contest.

Name Your Giveaway and Choose a Template
Once you click Add New, the plugin will take you to a new screen where you’ll name your giveaway and choose a contest entry form template.

First, type in a name for your giveaway in the text field at the top of the screen. Choose any name for your giveaway.
For instance, if your contest prize is an iPad, you can name your giveaway “iPad Giveaway.”
Next, choose your giveaway template.
RafflePress offers several pre-made contest entry form templates designed to reach particular giveaway goals, such as:
- Grow Your Email List
- Refer-a-Friend
- Pre-launch Campaign
- Grow Your Facebook Page and more.
For this tutorial, we’ll choose the Classic contest entry form template. This template allows you to create any type of giveaway contest using the easy RafflePress builder.
Choose the Classic Giveaway template by hovering over it and clicking Use This Template.

Set the Giveaway Prize Details
After selecting the Classic Giveaway template, you’ll be taken to the RafflePress giveaway builder. The first step to building your online giveaway is to set the giveaway prize details.
First, click on the pencil icon under the Giveaway Prize Details section.

Here, you can choose the name of your prize, for example, “iPad Giveaway,” and write a brief description of the prize.
You can also upload an image of your prize by clicking the Select Image button below the description box. You can then choose an image from your media library or upload an image from your computer.
When you’re happy with your prize name, description, and image, click on the Done Editing button.

You can click the + Add Another Prize button if you have multiple prizes to add more to your contest form.
You can also set the date and the time your giveaway will start and end and choose your timezone underneath the Start and End Time section.
Click the Save button to save the changes. Remember to save your work periodically throughout the process of building your contest.

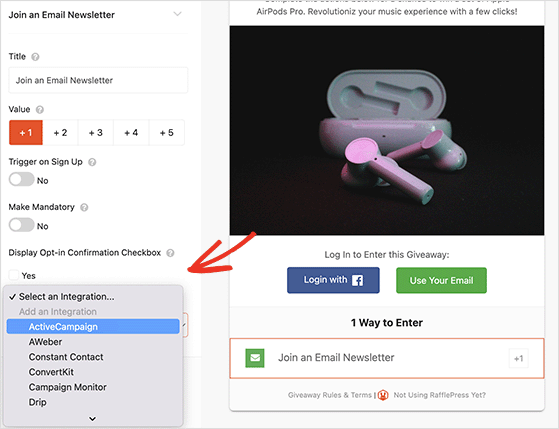
Choose Your Raffle Entry Methods
Entry actions are how participants earn chances to win. You can add as many as you want, and most entrants will complete all of them to improve their odds.
Click the Actions tab to see the full list. Actions are grouped by goal: growing your email list, increasing social engagement, or driving traffic to your site.
Click any action to add it to your contest.

Once you’ve chosen an action, you can set the entry options.
These settings include:
- The title
- Value (how many entries the action will be worth)
- If the action is mandatory
- A field to add your URL
If you add many entry methods, ensure that the most important actions are worth more entries.

Click the Save button to save your changes.
Repeat the process for any other actions you want to add to your contest. You can add as many as you want.
For instance, you can also add a Join an Email Newsletter action to boost subscribers, including an opt-in confirmation checkbox and integration with your email marketing service.
You can easily rearrange actions for your contest by dragging and dropping on the left side or delete actions by clicking the trash can icon on the right side.

Design Your Online Giveaway Contest
Next, you can customize the look of your online giveaway in the Design tab. You can choose from 2 different layouts (display image, then header, or header, then image) and several fonts and button colors.

If you’re creating a stand-alone page for your contest, you can also choose the page color background and a background image.
Hit the Save button once your contest looks precisely the way you want.
Configure Your Contest Settings
The Settings tab has six sections:
- General
- Giveaway Rules
- Email Verification
- Success Tracking
- Success Redirect
- Social Logins
One of the most important settings you’ll need to configure is the giveaway rules.
RafflePress makes it easy to get started. You can use the Rules Generator Template to quickly get a head start on creating your contest rules.
Clicking this button will allow you to type in the sponsor name, email, address, eligible locations, the minimum age to enter, and more.

You can check out our documentation for details on all the RafflePress settings.
After configuring your settings, click Save.
Publish Your Online Contest
Now you know how to run a giveaway, it’s time to make your contest live. Click the Publish tab at the top of the screen.
You have 3 publishing options for your contest:
- RafflePress WordPress Block – Embed the giveaway widget in your WordPress post or page (new WordPress block editor).
- WordPress Shortcode – Embed the giveaway in the classic WordPress editor, sidebar widgets, or inside your WordPress theme.
- Giveaway Landing Page – Create a distraction-free landing page on your website for your giveaway.
A dedicated landing page usually pulls the most entries. With nothing else on the page to distract from the prize, more visitors finish signing up.
So, let’s choose the giveaway landing page option.
Click the View Page button to see your contest landing page.
Here is an example of a giveaway landing page we created on our test website:

That’s it. You’ve got a clean landing page ready to collect entries.
Step 6: Promote It Where Your Audience Hangs Out
Once your contest is live, share it on the social platforms you’re most active on. Include a clear image of the prize and a direct link to your entry page.
To get more reach without paying for ads, add a Refer-a-Friend entry action in RafflePress. It gives participants an extra entry for every person they bring in, which means your contest spreads through their networks automatically.
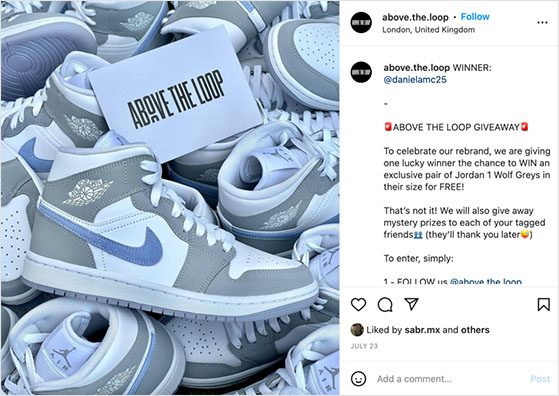
For instance, see this Instagram giveaway post from Brimhall Farmers Market’s Instagram Account. Their Instagram post includes a photo of the grand prize to let users know what they can win and #giveaway to widen their reach on social networks and Instagram feeds.

You can also promote your contest in these ways:
| Promotion Method | Best Used For |
|---|---|
| Paid Advertising | Targeted Reach |
| Email Marketing | Existing Audience |
| Social Media Sharing | Viral Growth |
| Influencer Partnerships | Brand Awareness |
Start promoting your contest a week or two before it goes live, so entries start landing on day one.
Need help getting the word out? Here are more contest promotion ideas to try.
Add Live “Someone Just Entered” Notifications
One tactic quietly lifts entries during the promotion window: real-time social proof. When visitors see entries rolling in, more of them join.
You can automate this inside WordPress with RafflePress and Uncanny Automator (the Pro version, with the Dynamic Content addon). RafflePress records each new entry, Automator detects it, and your site shows a live message like “Jordan from Geneva just entered the Summer Camera Giveaway.” No code required.
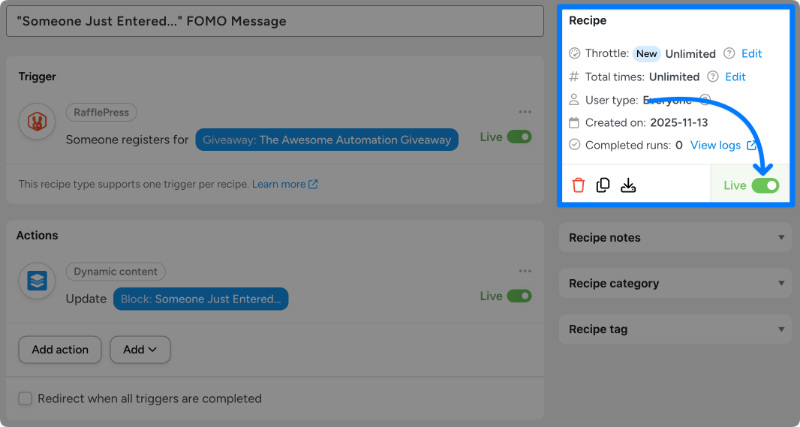
Keep it tasteful. Show each notice briefly, do not fire them so often they turn into noise, keep the copy short, and use a first name plus a general location rather than full personal details so you stay on the right side of GDPR.
Step 7: Announce Your Winner to Boost Credibility
When your contest ends, it’s time to pick a winner and share the results. With RafflePress, you can randomly select winners in a few clicks.
Head to RafflePress » Giveaways, click Needs Winners, and hit Pick Winner. You can email the winner directly from your dashboard.

Once chosen, announce your winner on your website, email, and social media. This gives your contest a strong finish and keeps everyone feeling good about participating.

Tip: Offer a discount code to non-winners to turn entries into future customers.
Email All Entrants After Your Contest
Most businesses stop at announcing the winner. That’s a missed opportunity.
Every person who entered is already interested in what you offer. Send a follow-up email within 24-48 hours of your contest ending.
Thank them for participating, announce the winner, and include a consolation offer for everyone who didn’t win.
A discount code, a free resource, or early access to your next contest all work well here. Entrants who took action once are more likely to take action again.
That’s how a single contest becomes a long-term list-building system.
Step 8: Track What Worked (and What Didn’t)
Once your giveaway ends, take a few minutes to see how it performed. RafflePress includes built-in reports that show you which entry methods worked best.

If you’re using MonsterInsights, you can also track pageviews, traffic sources, and conversions right from your WordPress dashboard. This helps you see where your traffic came from and what actions users took.

You can also send entrants to a custom thank-you page after they enter, giving you a clean conversion to measure.
Use these insights from your giveaway metrics to improve your next contest. For example, if Instagram entries performed better than Facebook, focus your next promotion there.
Which Contest Should You Run? Ideas by Business Goal
Now you know how to build a contest. The exact setup changes depending on what you’re trying to achieve.
A store owner, an affiliate manager, and a local service business all want different things from a giveaway. Here’s how to tailor each one.
Running a Contest for an Online Store (WooCommerce or Shopify)
Store owners have one job with a giveaway: turn browsers into buyers, not just collect entries. That changes which entry actions you pick.
Make Join Newsletter a mandatory action so every entrant joins your list, then add a Visit a Page action pointing at a specific product URL to push product views. Keep social follows optional so the required steps stay quick.
Prize choice matters more than anything else here. Pick a prize worth about 2 to 3 times your average order value.
Too cheap and there’s no urgency. Too lavish and you attract freebie hunters who’ll never buy.
A generic prize like an iPad pulls in people who have no interest in your store. A tiered structure works well: one main prize plus a handful of runner-up discount codes keeps non-winners shopping instead of disappearing.
Before you publish, turn on a few store-friendly settings: a success redirect that sends entrants to a product or thank-you page, a GDPR consent checkbox, and reCAPTCHA to block spam entries. Then embed the contest with a shortcode on a product page, a sidebar widget, or a post, or publish it as a standalone landing page.
Selling on Shopify? RafflePress is a WordPress plugin, not a Shopify app, so you run the giveaway on your WordPress site and point entrants to your Shopify store.
That is a feature, not a workaround. Your email addresses and entry data live in your own database, it is a one-time cost instead of a monthly app subscription, and you get the built-in refer-a-friend mechanic most Shopify-native apps do not offer.
If the two are not connected yet, here is how to integrate Shopify with WordPress.
Contests to Energize an Affiliate Program
If you run an affiliate program, a contest gives your affiliates a reason to push harder inside a set window. It is a win both ways: the harder they promote, the more visibility you get and the more commission they earn.
There are three formats, each suited to a different goal:
| Contest Type | How It Works | Best For |
|---|---|---|
| Sales leaderboard | The affiliate who drives the most revenue wins | Product launches, motivating top performers |
| Flat-prize threshold | Every affiliate who hits a set sales or referral target wins | Activating mid-tier or dormant affiliates |
| Content-creation contest | Affiliates create a blog post, video, or social campaign to enter | Brand awareness, building a promo-content library |
A leaderboard is energizing for high performers but can demotivate affiliates who know they cannot beat the top earner. A flat-prize threshold pulls in broader participation because everyone who clears the bar wins.
Content-creation contests take the most effort but leave you with blog posts and videos that keep driving traffic after the contest ends.

Match the reward to the effort. Commission boosts, a flat cash bonus for the top affiliate, gift cards, or access to exclusive tools consistently beat generic merch, because affiliates are already motivated by money and recognition.
Fraud prevention starts at the rules, not the plugin. Make entries measurable and verifiable.
For content entries, require a URL to a live, indexed post.
For referral entries, use your affiliate platform’s verified tracking data, never self-reported numbers. Pair that with reCAPTCHA and email verification.
Lock the winning criteria before you launch and share them publicly, because changing the rules mid-contest damages trust faster than almost anything else.
A contest also feeds the top of your funnel: grow your email list now, then market affiliate offers to those subscribers later. It works, too.
OptinMonster added 3,500+ new users from a single giveaway using this approach.
Collecting Customer Reviews With a Giveaway (Legally)
Can you run a giveaway to get Google reviews? No.
Google, Amazon, and Yelp all prohibit any incentive tied to a review, raffle entries included, and violations can get your reviews removed or your account penalized. So before you build one, you need to know where incentivized reviews are actually allowed.
Trustpilot, G2, and Capterra all permit review giveaways, as long as you disclose them:
| Platform | Review Giveaways Allowed? | Notes |
|---|---|---|
| Trustpilot | Yes | Requires disclosure that the reviewer entered a contest |
| G2 | Yes | Allowed with transparent, FTC-compliant disclosure |
| Capterra | Yes | Permitted with proper disclosure |
| No | Prohibits any incentivized reviews | |
| Amazon | No | Strictly prohibits review incentives |
| Yelp | No | Not permitted under community guidelines |
Wherever you collect reviews, the FTC requires you to disclose that the reviewer entered a contest anywhere that review or testimonial appears. And reward the review itself, never a positive review.
You are paying for honest feedback, not for praise.
It is worth the effort: 98% of consumers read online reviews before buying, and most read around 10 before they trust a business, so every honest review you collect moves the needle on sales.
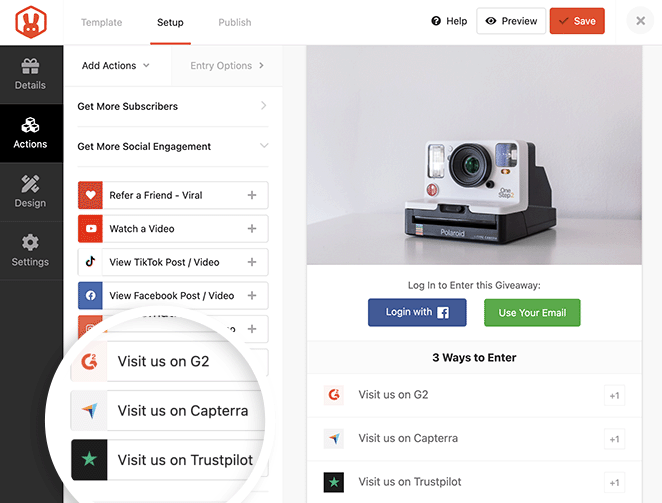
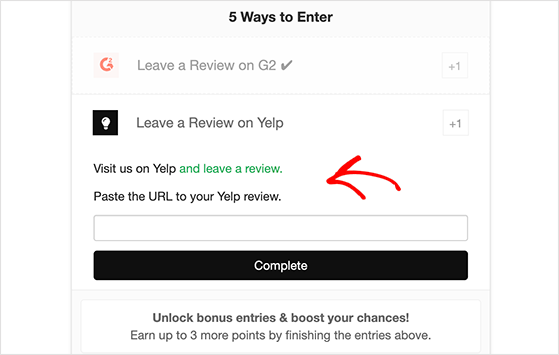
RafflePress has dedicated entry actions for Trustpilot, G2, and Capterra that send participants to your listing and give them a field to paste their review URL. If your platform is not built in, the Invent Your Own action lets you write custom instructions and have entrants confirm their submission manually, so almost any review site is covered.
Seasonal and Themed Giveaways
Tying a contest to a moment, a holiday, a season, or a cause, gives people a reason to care right now. Earth Day is a good worked example, and the same playbook copies onto any occasion.
Pick prizes that fit the theme. For an eco giveaway that could mean physical prizes like reusable totes, plantable seed paper, or recycled notebooks bundled into a themed gift box, or low-waste digital prizes like eBooks, printable journals, gift cards for eco-friendly brands, or course access.
Then choose a theme your audience links to your brand. “One Planet, One Love” suits a peace-focused brand, while “Go Green” fits a sustainability angle.
The Central Kootenay Invasive Species Society built theirs around “How do you connect with nature?”, and the children’s literacy charity Bookmark teamed up with book brands to give away a kids’ book bundle.

On timing, start promoting 7 to 10 days ahead, match all your creative to the theme, use themed hashtags, and partner with a relevant brand or nonprofit to widen your reach. Swap Earth Day for Black Friday, back-to-school, or your brand’s anniversary and the same approach still works.
FAQs on How to Run an Online Contest
How long should an online contest run?
Most online contests run for 1–4 weeks. You want to give people enough time to enter but not so much that they forget about it. A 2-week window usually works best for engagement and urgency.
What are some common mistakes to avoid when running a giveaway?
Some common mistakes to avoid when you run a contest include not clearly defining the rules or entry requirements, not promoting the giveaway enough, not following up with the winner promptly, and not complying with legal requirements.
Can I run a giveaway if I don’t have a large following?
Yes, you can run a giveaway even if you don’t have a large following. A giveaway can be an effective way to attract new followers and increase engagement on your social media channels.
How can I ensure my giveaway is fair and transparent?
To ensure that your giveaway is fair and transparent, you should clearly define the rules and entry requirements, use a tool to select the winner at random and follow up with the winner promptly. It’s also a good idea to announce the winner publicly and provide a way for entrants to contact you with any questions or concerns.
What is the easiest way to create an online contest?
The easiest way to create an online contest is with a WordPress plugin like RafflePress. It includes drag-and-drop tools, built-in templates, automatic rules, and entry tracking, no coding required. You can set up a contest in under 30 minutes and start collecting entries right away.
What’s the difference between a giveaway and contest?
The main difference between a giveaway and a contest is how winners are chosen. In a giveaway, winners are picked randomly, so no special effort is needed. In a contest, people compete by showing skill or talent, and judges pick the best entry to win.
If you’re confused about the terminology, you can learn the difference between sweepstakes vs contest vs lottery here.
Can you run a giveaway to get Google reviews?
No. Google, Amazon, and Yelp prohibit any incentive tied to a review, including raffle entries, and violations can get your reviews removed. For a compliant review giveaway, use Trustpilot, G2, or Capterra, which allow it with proper disclosure, or collect reviews on your own website.
Do I need a separate app to run a Shopify giveaway?
No. RafflePress runs on your WordPress site, so you can host the giveaway there and point entrants to your Shopify store. You avoid a monthly Shopify app subscription, keep your entry data in your own database, and get refer-a-friend viral entries that most Shopify apps do not include.
How do I keep affiliates from gaming a contest?
Set rules that are measurable and verifiable. For content entries, require a URL to a live, indexed post. For referrals, use your affiliate platform’s verified tracking rather than self-reported numbers, and pair it with reCAPTCHA and email verification. Lock the winning criteria before launch and publish them so no one can dispute the result.
What prizes work best for a seasonal or eco-friendly giveaway?
Match the prize to the theme. For an eco giveaway, that means on-theme physical prizes like reusable totes, plantable seed paper, or recycled goods, or low-waste digital prizes like eBooks, eco-brand gift cards, or course access. A themed gift box that bundles a few small items together tends to feel more valuable than a single item.
Start Your WordPress Contest Today
You don’t need a developer or a big budget to run a contest that grows your list. Pick a prize your audience wants, set up your entry actions in RafflePress, and launch it today.
You might also find these social media contest guides helpful:
- How to do a giveaway on Facebook
- How to run a Pinterest contest
- How to run a social media photo contest
- How to do a YouTube video contest
- How to run a Facebook flash giveaway
- How to promote your contest on multiple platforms
If you liked this article, please subscribe to our YouTube Channel for RafflePress video tutorials. You can also find us on Twitter and Facebook.


