New Update: Boost Social Proof with Reviews & Automation
New Update: Boost Social Proof with Reviews & Automation
 John Turner
 John Turner
Want to know how to create a coming soon page in WordPress that builds buzz before your site is live? I’ve used this exact setup to collect emails, test offers, and start getting traffic before launch day, and you can do the same.
In this step-by-step guide, I’ll show you how to build a coming soon page in WordPress using SeedProd, the best page builder for beginners. You won’t need any coding, and you’ll be ready to grow your audience from day one.
Quick steps to create a coming soon page in WordPress:
But first, let’s explore what a coming soon page is and when you should use one for your website.
A coming soon page is a type of landing page designed to tell website visitors that your new WordPress site is coming soon. Sometimes it might be called something different, such as a pre-launch page or an under-construction page. Either way, the message is the same: something awesome is arriving soon.

Visitors can learn more about your business on your coming soon and get a sneak peek at what’s coming while the actual work is hidden. Sometimes this is confused with Maintenance mode, which you should use when you’re only making minor changes.
If you’re unsure, check out this article to learn the difference between Coming Soon vs Maintenance Mode.
Coming soon pages usually include the following page elements:
This means you can generate traffic, leads, and interest in your target audience well before your website is due to go live.
Creating a coming soon page is also an excellent way to rank your website in Google search results. Search engines like Google take time to index new pages, so having a landing page up as soon as possible will cut some of the wait time.
Plus, the Google bots that look out for new websites to index don’t mind if they see a coming soon message. They care about the content, keywords, and user experience. So by adding a keyword-optimized and engaging under-construction page to your site, you’re doing your business a favor in the long term.
Now that you know what a coming soon page is and when to use one, let’s look at how to create a coming soon page in WordPress with our step-by-step guide.
The easiest way to create a coming soon page for your website is with a WordPress coming soon plugin. We’ll be using SeedProd, the best WordPress website builder, coming soon page and maintenance mode plugin on the market.
SeedProd makes it easy to build any page or layout in WordPress, and it’s one of the best landing page plugins for speed and ease of use.
You can select from over 100+ stunning landing page templates or create a custom layout from scratch with the easy drag-and-drop builder, with no coding needed.
SeedProd also has the following powerful features:
Compared to other page builders that are slow and bloated, SeedProd is optimized for speed. This ensures your pages are the fastest, so you can rank higher in SEO.
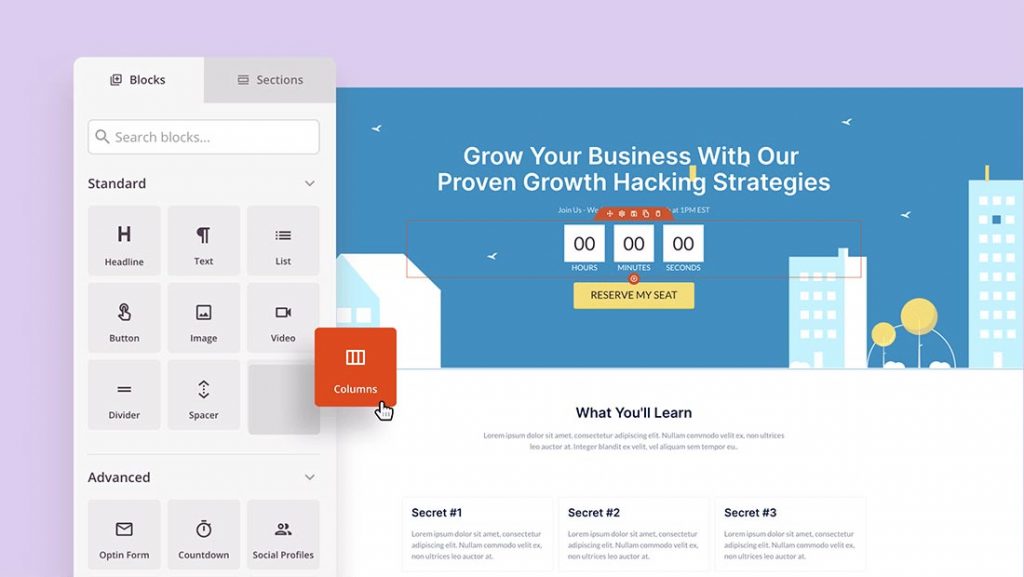
SeedProd’s smart design system helps you save time by saving and reusing elements across your pages instead of repeating the same work. You can set color schemes and font combinations and save page templates, custom page blocks, sections, and more.
It comes with all the blocks and features you’d expect, such as:
Many blocks even have pre-made templates so you can speed up the design process and add your favorite styles with 1 click, which is ideal for beginners.
SeedProd works with all major WordPress plugins. It also includes subscriber management and is easily integrated with popular email marketing services like Constant Contact, Mailchimp, ActiveCampaign, and more.
Best of all, it has built-in coming soon and maintenance modes you can turn on and off with a single click. This makes building and launching your coming soon page a breeze.
If you want to create a coming soon page in WordPress easily, follow this tutorial to do it with SeedProd.
Why this step matters: SeedProd gives you everything you need to build a professional coming soon page in WordPress without coding. It’s beginner-friendly and works with any theme or plugin.
First, click here to get started with SeedProd and download the plugin to your computer. Then if you need a little help, you can follow these steps for installing a WordPress plugin.
Note: SeedProd offers a free version with simple functionality. However, we’ll use the premium version for the advanced features.
After installing and activating the SeedProd plugin, you’ll see a page asking you to enter your license key. After purchasing the plugin, you’ll find the license key in your SeedProd account under the Downloads section.

Enter your key in the box provided and click the Activate Key button.
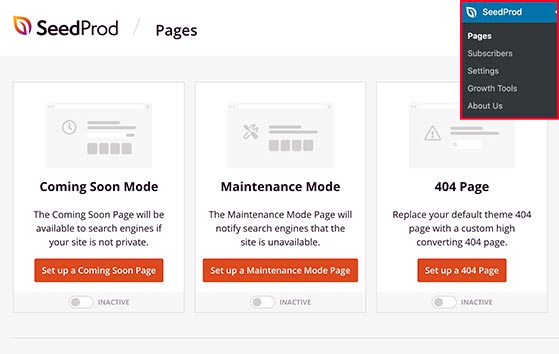
Next, click SeedProd » Pages from your WordPress admin area to see the SeedProd dashboard where you can create your first coming soon page.
Why this step matters: Choosing the right page type ensures visitors see your coming soon message instead of an unfinished site. SeedProd’s templates make this fast and easy.
Along the top of the SeedProd dashboard, you’ll see 3 different page modes, which include:
Underneath, you create any other type of landing page using the drag-and-drop builder.
Since you want to build a coming soon page, click the Set up a Coming Soon Page button in the Coming Soon Mode section.
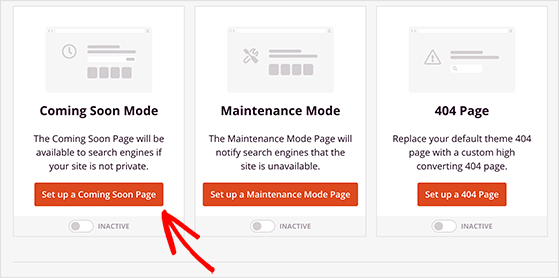
This will redirect you to SeedProd’s growing library of landing page templates. SeedProd will automatically filter the templates to show the available coming soon page templates.
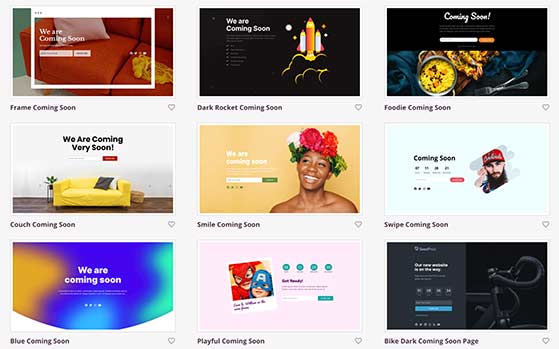
You can choose any template you like, then when you’re happy with the design, hover your mouse over the template thumbnail and click the tick icon to launch it in the visual page editor.
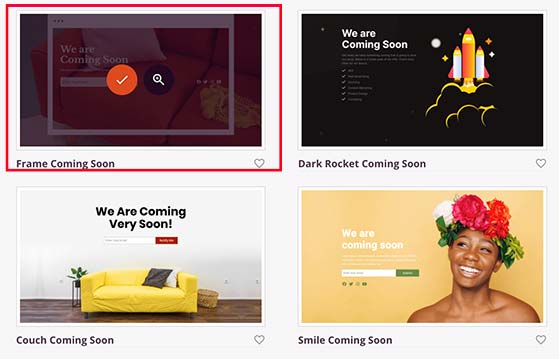
For this example, we’ll use the Frame Coming Soon template.
Why this step matters: Customizing your page content helps you connect with visitors, build trust, and explain what’s coming. You can also collect leads while you’re still building your site.
With the visual drag-and-drop builder, you can now add new content to your coming soon page.
On the left side of your screen are the available landing page blocks you can use to edit your page content.
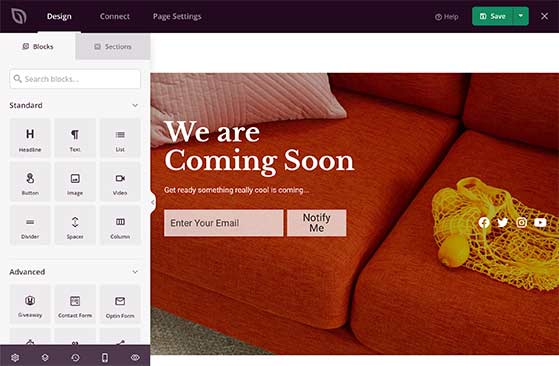
SeedProd’s landing page blocks come in 2 different sections: Standard blocks and Advanced blocks.
The Standard landing page blocks include everything you need to design a great-looking page, including image blocks, headlines, text, buttons, video blocks, bullet lists, dividers, and more.
In comparison, the Advanced blocks are more focused on generating leads and growing your email list, such as:
The main focus of these blocks is to maximize your lead generation efforts before you launch your website. As a result, you won’t see any unnecessary elements cluttering the builder.
Plus, almost all of these blocks integrate with powerful WordPress plugins such as RafflePress to create an online contest, WPForms to build user-friendly contact forms, and many more without needing a developer.
Adding any block to your coming soon page is as simple as dragging one from the left side of your screen onto your coming soon page.
For example, if you want to let people know how long is left before your website launches, you might want to add a countdown timer.
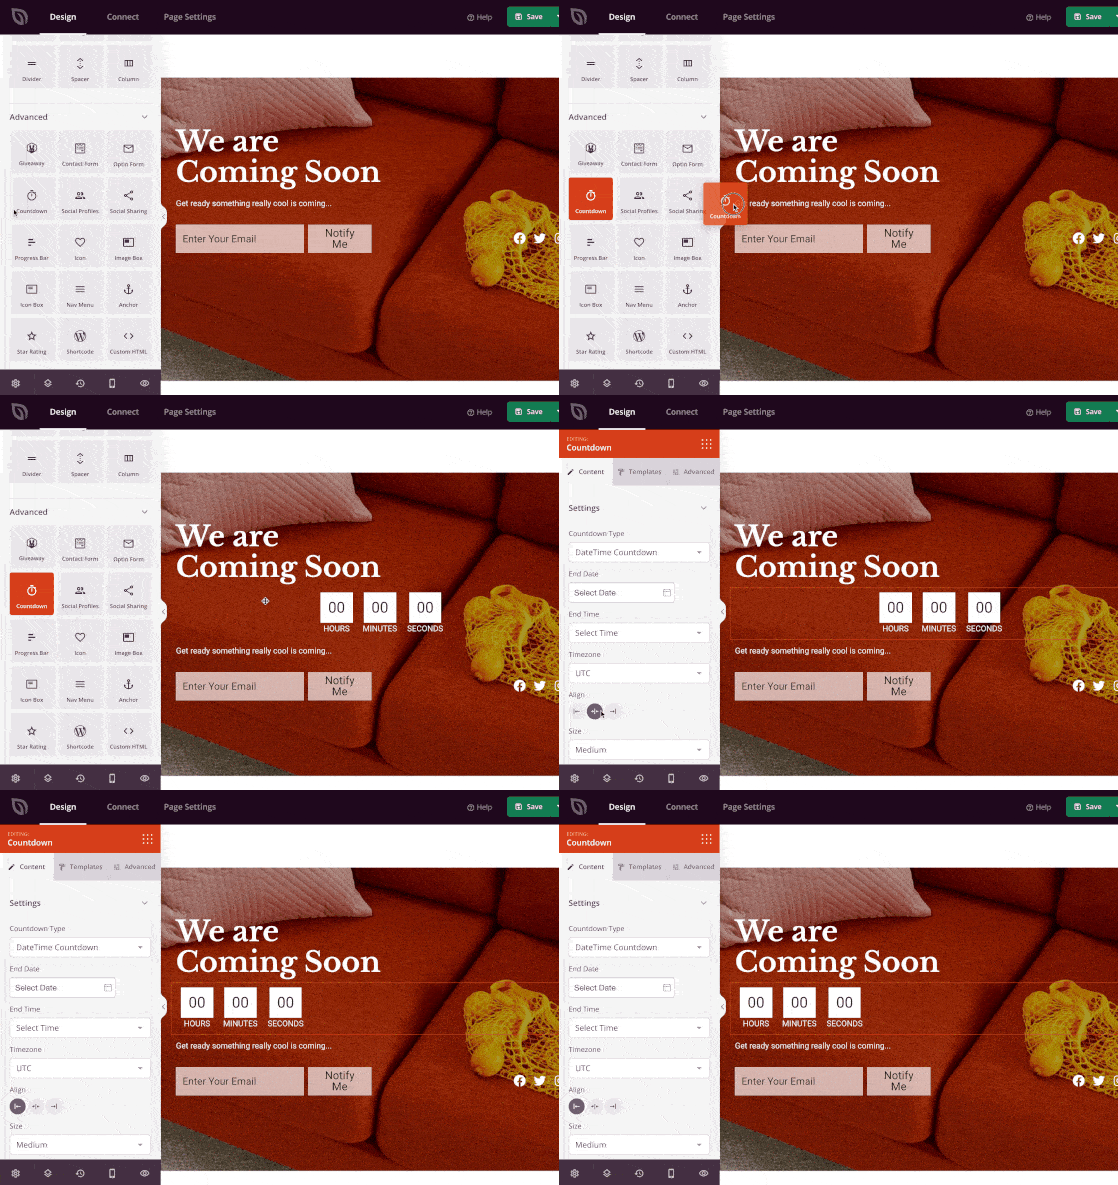
Just drag the countdown timer block from the left-hand panel and drop it on your page on the right.
Clicking the countdown timer block on your page preview shows several customization options in the left panel. Here you can change the countdown type, set an end date and time, change the alignment, and more.
You can also select a different style by clicking the Templates tab and choosing the one you like the most.
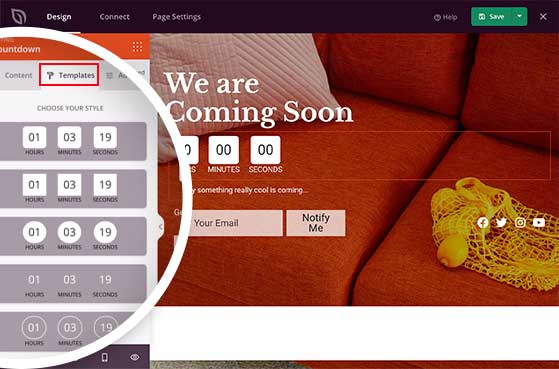
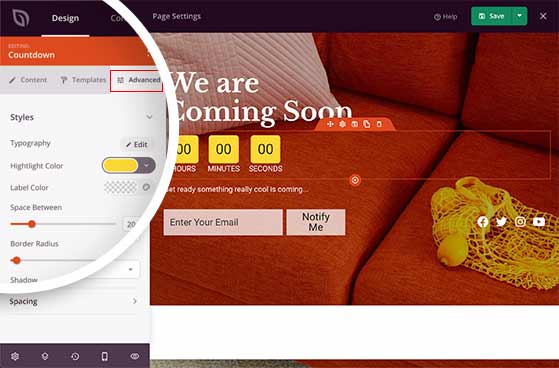
You can choose custom colors, typography, shadows, and more in the Advanced tab until you’re happy with the final look.
SeedProd also has several content sections to complement the page blocks. You can find them by clicking the Sections tab on the left.
Sections are premade layouts you can add to your coming soon page without having to build them block-by-block.
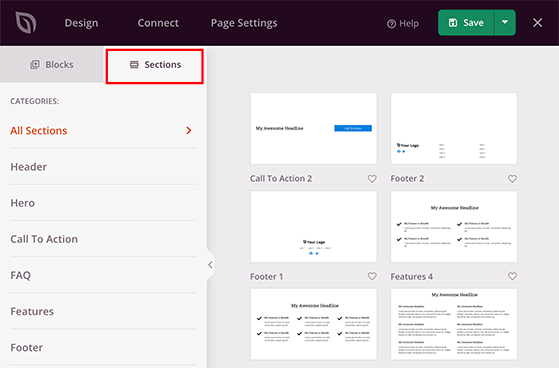
You can find sections devoted to headers, hero areas, calls to action, FAQ, features, and footer areas. Clicking any section automatically adds it to your coming soon page.
In the example below, we added a FAQ section to our coming soon page. This will help answer users’ questions about your new website before the big day.
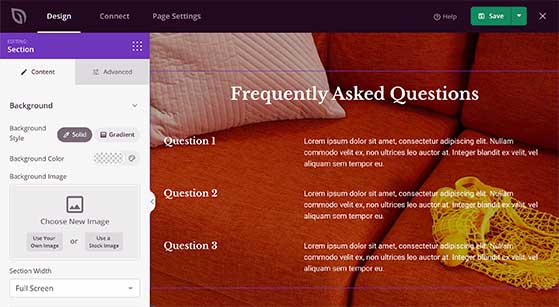
Continue adding content to your page until you’re happy with how everything looks. Then click the Save button in the top-right corner to store your settings.

Why this step matters: Branding your coming soon page with your colors, fonts, and images makes it feel more polished and professional. It sets the tone for your full site launch.
The next step is customizing your coming soon page to match your website’s branding.
To do this, click the Global Settings option, which is the gear icon in the bottom-left corner of the page builder.
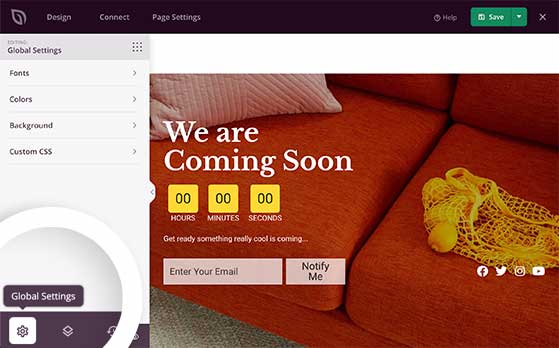
This takes you to the Global Settings page, where you can customize your entire page’s colors, fonts, background colors, and images, and even add your own custom CSS.
To change your global page background, click the Background section.
In the background customization panel, you can change the background style to solid or gradient, add a background color, and upload a new background image. It’s also possible to add a background video or scrolling slideshow.
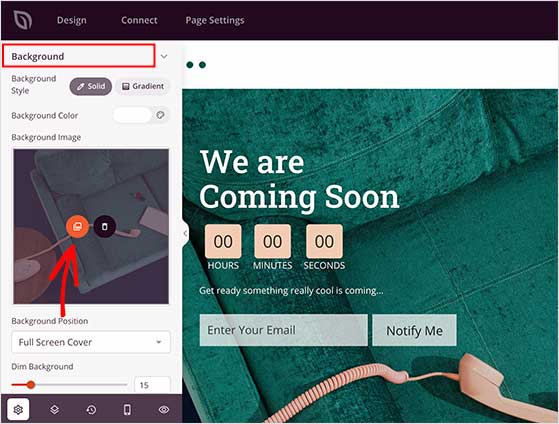
To change the background image, hover your mouse over the background photo thumbnail, and click the image icon. Then you can upload a new image from your computer or your WordPress media library.
If you want to change your global color settings, click the Color section.
In this area, you can change the color of your headers, text, buttons, links, and text backgrounds.
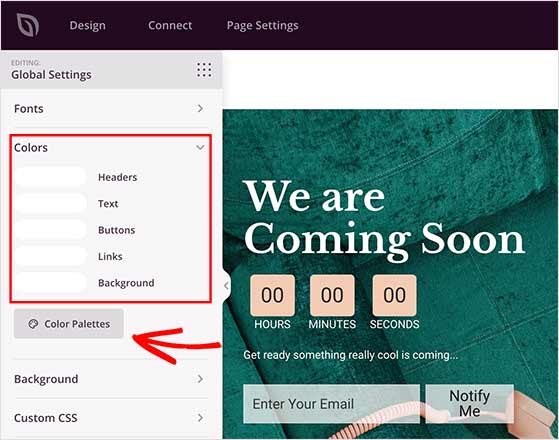
You can also click the Color Palettes button and select from over 20 pre-made color palettes for your coming soon page.
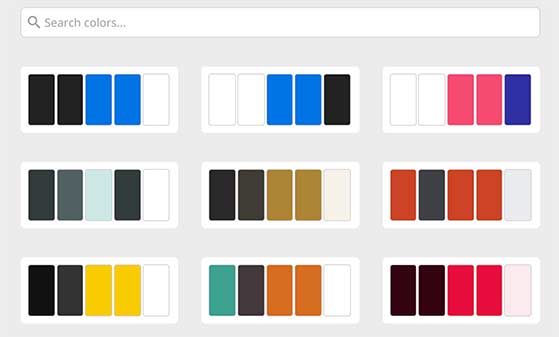
The same is true for the Fonts sections.
You can select from hundreds of Google web fonts and change the font weights.
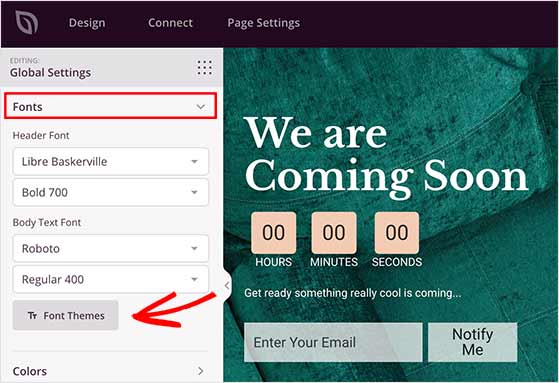
Clicking the Font Themes button reveals a library of different font combinations with a preview of how they’d look on your page.
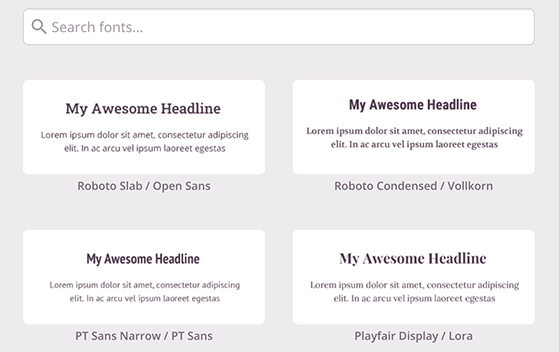
Remember to click Save before moving on to the next step.
Why this step matters: Connecting your email list lets you collect subscribers before your site goes live. You can notify them on launch day or send updates along the way.
To manage new email list subscribers, you’ll need to connect your email marketing service to your coming soon page. SeedProd makes this easy by integrating with popular email marketing providers.
First, click the Connect tab at the top of the page builder. This will show you all the different connections available.
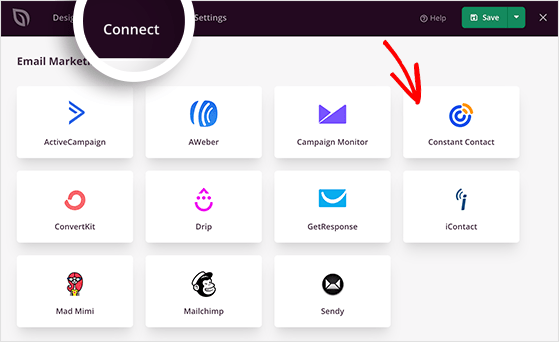
Then go ahead and select your preferred email service and click the Connect New Account button.
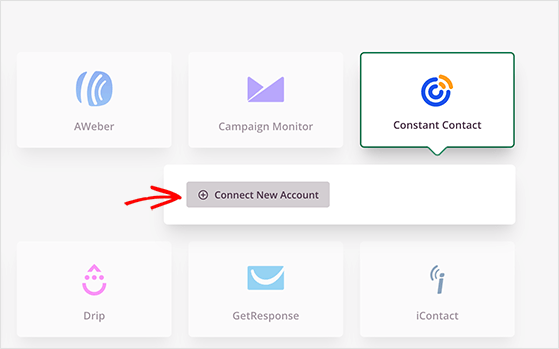
After that, follow the on-screen instructions to authorize and verify the connection.
For complete instructions on integrating specific email providers, see the SeedProd integration documentation.
On the same page, you can also connect to Google Analytics to track your page performance, Recaptcha to prevent spam, and Zapier, which provides access to thousands of tools and applications.
Why this step matters: Fine-tuning these settings helps you control who sees your page and how it behaves. You can hide certain URLs, allow team access, and track performance.
Once you’ve connected your email list, you’ll need to configure your page settings. You can do this by clicking the Page Settings tab at the top of the page builder.
On this page, you can configure your page’s general settings, SEO, and Analytics settings via All in One SEO and MonsterInsights, and add custom header, body, and footer scripts.
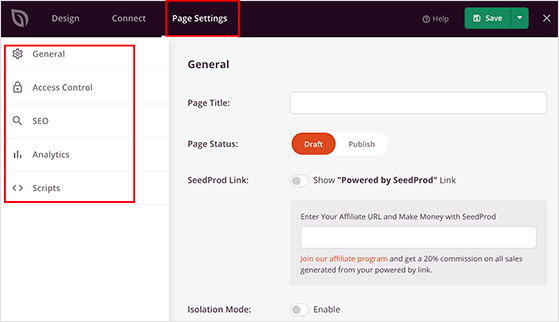
The most important section is the Access Control area. You can control who will see your coming soon page and who sees your standard website on this page.
You can exclude URLs with the terms: login, admin, dashboard, and account to prevent lockouts. Or you can create a bypass cookie instead of creating a WordPress user to bypass the page.
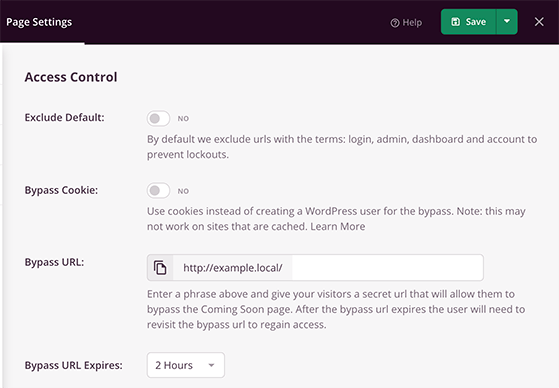
Creating a unique Bypass URL for your coming soon page is also possible. Then anyone who accesses your website with that URL will bypass the coming soon page and see your standard website. This helps you share your progress with a client or another member of your team who doesn’t have login access.
Furthermore, you can hide specific pages in WordPress by using the Include/Exclude URLs section. Just add any page URL you want to hide behind your coming soon page on a new line in the box provided.
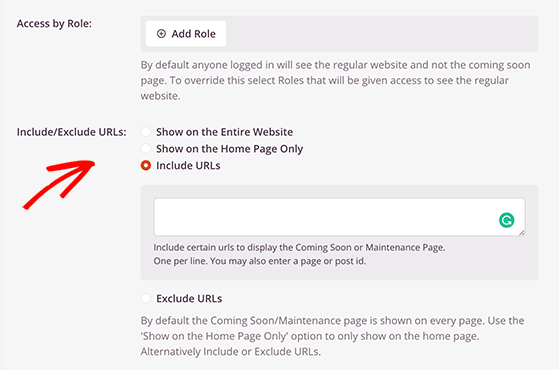
When you’ve finished configuring your settings, click the Save button.
Why this step matters: Publishing your page puts it live on the web so visitors can see it. You can still tweak the design or content anytime from your dashboard.
Now that you’ve created your coming soon page in WordPress, it’s time to make it live. But before you do that, you must ensure it displays correctly on different device sizes.
SeedProd makes it easy to preview your landing page on both desktop and mobile devices to check that it’s responsive.
Switch to the Design tab to view your coming soon page in the visual editor, then click the Mobile Preview option in the bottom-left corner.
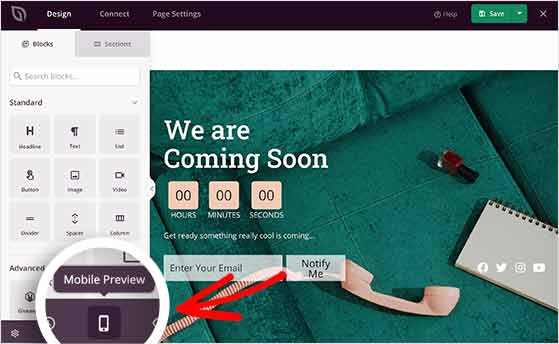
This will show you a preview of your coming soon page as users see it on mobile devices. You can edit the mobile preview, just like the desktop version, if anything looks odd.
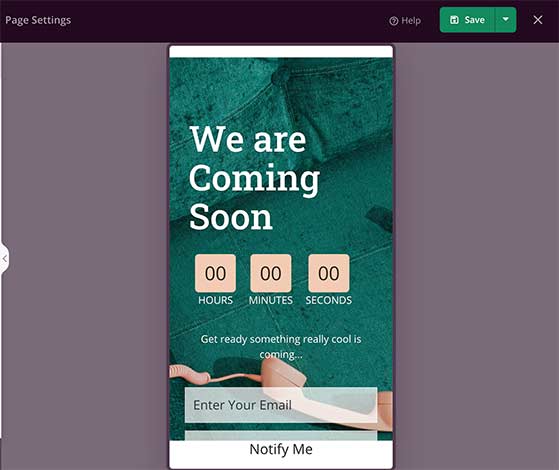
Just click the same icon in the bottom-left corner to switch back.
Now that everything looks great let’s go ahead and publish your coming soon page.
In the top-right corner of your screen, click the downwards arrow next to the save button, and click Publish.
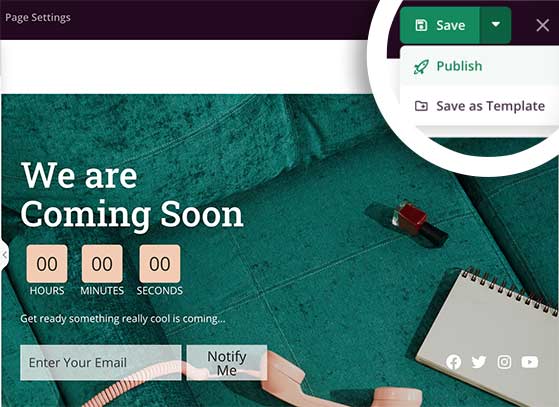
SeedProd will then show a popup telling you your coming soon page has been published.
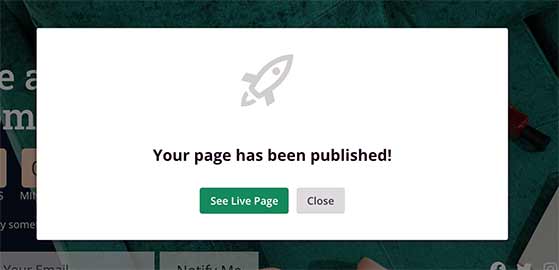
Click the See Live Page button for a live preview of how it looks.
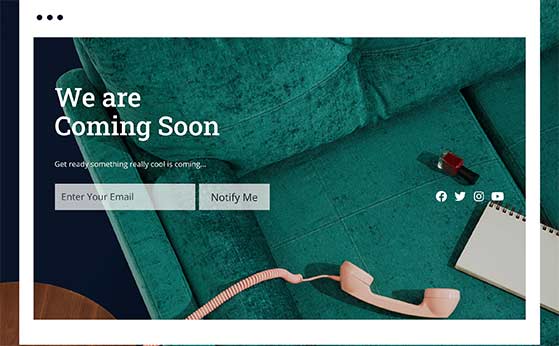
Why this step matters: Turning on Coming Soon Mode hides the rest of your site from the public while you work behind the scenes. Only the coming soon page will be visible.
With your coming soon page published, the last step is to enable coming soon mode on your WordPress website.
From your WordPress dashboard, navigate to SeedProd » Pages and find the Coming Soon Mode section.
Then, turn the toggle from Inactive to Active.
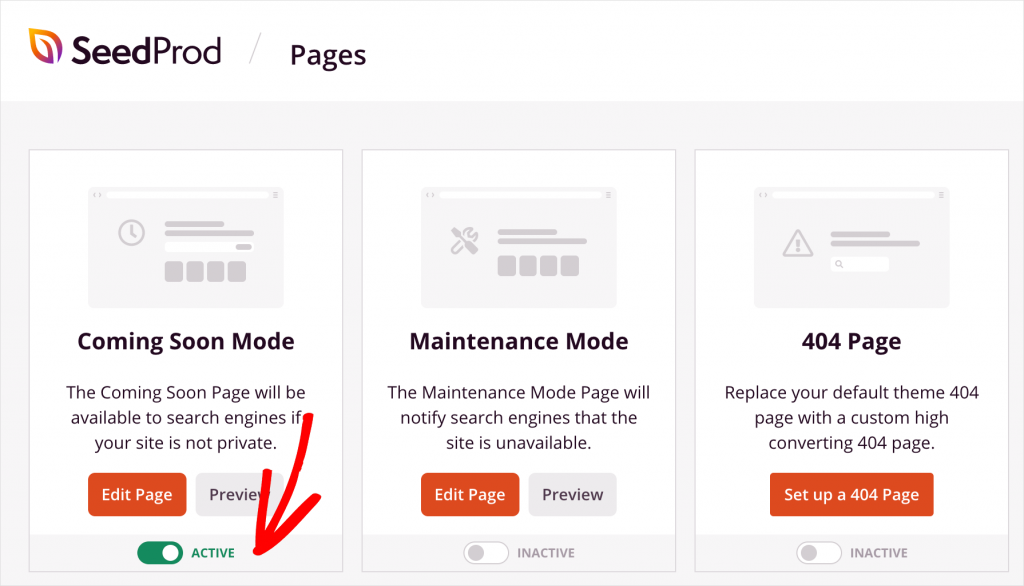
Now anyone visiting your website will see the coming soon page you just created.
By now, you should know exactly how to create a coming soon page in WordPress that helps you grow your audience before launch day. Whether you’re testing an idea, building your site, or prepping for a big revea, a coming soon page can give you a serious head start.
Looking for more tips to get your website off the ground?
While you’re here, don’t forget to follow us on YouTube, Twitter, and Facebook for more great tips to grow your business.
Disclosure: Our content is reader-supported. This means if you click on some of our links, then we may earn a commission. We only recommend products that we believe will add value to our readers.
Copyright © 2024 SeedProd LLC. RafflePress® is a registered trademark of SeedProd LLC