How to Run a Photo Contest on Facebook (the Easiest Way)
 Stacey Corrin
Stacey Corrin
Stacey Corrin
 John Turner
John Turner
John Turner

TL;DR: How to Run a Photo Contest on Facebook (Step-by-Step)
A Facebook photo contest takes about an hour to set up if you use RafflePress. Here’s the short version, plus how to take the same contest to Instagram, run it as a selfie contest, and collect photos on your own site.
- Set goals: decide what you want (followers, email list, user photos) before you build anything.
- Pick a theme and duration: choose a theme that fits your brand and run the contest for 1-2 weeks.
- Write your rules: cover eligibility, entry period, prize, winner selection, photo rights, and a Facebook disclaimer. Grab the copy-ready template below.
- Build it with RafflePress: use the Facebook giveaway template to run a photo submission contest on your website.
- Publish and promote: share the contest link on Facebook, Instagram, email, and every channel you have.
- Follow up: announce the winner publicly, reuse the photos with permission, and measure your results.
Photo contests sound simple until you realize there’s a moderation queue, a rules page, and Facebook policies to navigate.
I like them because they do more than a standard giveaway. When people share photos with your product, you get authentic content that builds trust and keeps paying off in future campaigns.
In this guide, I’ll show you how to set up a Facebook photo contest step by step using RafflePress, a WordPress giveaway plugin built for exactly this. Then I’ll show you how to take the same contest to Instagram, turn it into a selfie contest, and collect user-submitted photos on your own site.
Quick links:
- What are the rules for a Facebook photo contest? (with a copy-ready template)
- How to run a photo contest on Facebook (9 steps)
- How to run a photo contest on Instagram
- How to run a selfie contest
- How to collect user-submitted photos on your site
What Are the Rules for Running a Photo Contest on Facebook?
Before you build anything, you need to understand Facebook’s rules for contests and promotions. Getting these wrong is the fastest way to have a contest shut down.
Here’s what your Facebook photo contest rules need to cover:
- A link to Facebook’s official contest rules and a clear statement of who can enter.
- Compliance with the local laws and regulations that apply to contests and prizes where you operate.
- A complete release for each participant.
- A statement that your contest is not endorsed by Facebook.
- No requirement for people to share your contest on their personal timelines or tag friends to enter. Facebook doesn’t allow it.
A Copy-Ready Photo Contest Rules Template
This is the part most brands rush, and it’s the part that protects you. A solid rules page covers eligibility, dates, the prize, how you’ll pick a winner, and what rights you’re asking for over the photos people submit.
You can adapt the template below as a starting point. Fill in every bracket, and swap the platform name depending on where you promote it.
Photo Contest Rules Template
Eligibility: Open to legal residents of [Country], aged [minimum age]+. Employees of [Brand Name] and their immediate family members are not eligible.
Entry period: Entries accepted from [Start Date] at 12:00 AM [Timezone] through [End Date] at 11:59 PM [Timezone].
How to enter: Submit one original photo via [entry method] that meets the contest theme: [theme description]. One entry per person.
Prize: [Exact prize description]. Approximate retail value: $[amount]. No cash substitution.
Winner selection: Winner will be selected by random draw from all eligible entries on [date]. Winner will be notified by [email or direct message] within [X] days and must respond within [X] days to claim the prize.
Photo rights: By entering, you confirm the photo is your own original work and grant [Brand Name] a non-exclusive, royalty-free license to use, reproduce, and display your submitted photo in marketing materials, social posts, and advertisements, with credit where possible.
Data: Your name and email will be used to administer the contest and may be added to our mailing list. You can unsubscribe at any time.
Platform disclaimer: This contest is in no way sponsored, endorsed, or administered by, or associated with [Platform Name].
If you’re running the contest on more than one platform, add the guidelines for each one you use. Facebook, Instagram, X (Twitter), Pinterest, and TikTok each have their own contest terms you’re expected to follow.
For the full breakdown, see our guide on how to write giveaway rules like a pro.
How Do You Run a Photo Contest on Facebook?
Photo contests are ideal for gathering user-generated content from your fans. With permission, you can reuse that content in future messaging about your brand.
Couple that with the reach of Facebook, and you’ve got the recipe for a viral giveaway that drives potential customers to your website. Here are the nine steps I follow.
1. Set Goals for Your Contest

Your goals should reflect what you want for your business. Then you can craft the contest that turns those goals into real outcomes.
According to Dr. Edwin Locke, an expert in goal-setting theory, clear and challenging goals have a real impact on results.
His research found that:
- Challenging goals drive better results than easy ones.
- Clear, specific goals beat vague ones like “do your best.”
- Incentives like rewards and time limits work best when they line up with your specific goals.
Using SMART goals (Specific, Measurable, Achievable, Relevant, and Time-bound) helps you stay focused and track progress.
Here are the outcomes worth targeting:
- Increase Facebook followers: aim for a specific number and track it in Facebook Insights.
- Drive website traffic: use a tool like Google Analytics to monitor referral traffic from your contest posts.
- Collect user-generated content: gather a set number of photos for future campaigns.
- Grow email subscribers: ask people to sign up for your newsletter as part of entering.
How long should a Facebook photo contest run? The sweet spot is 1-2 weeks. That’s long enough for shares to compound, but short enough that people don’t assume they have plenty of time and never enter. Running it around a holiday or event can lift participation, and smaller daily prizes leading up to a grand prize keep people coming back.
2. Choose a Theme for Your Photo Contest
Successful photo contests almost always have a theme. It gives people a reason to enter and steers the kind of photos you get back.
A clear theme also produces content you can genuinely reuse. A vague one produces a pile of random photos nobody asked for.
Here are a few directions that work:
- Seasonal events: tie the contest to Mother’s Day, Halloween, or Thanksgiving to ride the festive mood.
- Product-in-use: a kitchen brand could ask for cooking photos, a fitness brand for workout shots. You get real UGC you can put in ads.
- Community engagement: a local business could ask for photos of favorite local landmarks or events.
- Creative challenge: give people a constraint. “Show us your workspace” invites more interesting entries than “show us your product.”
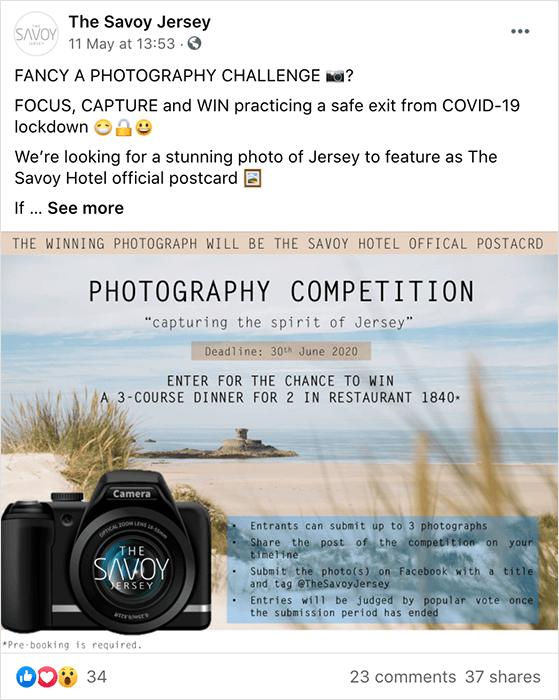
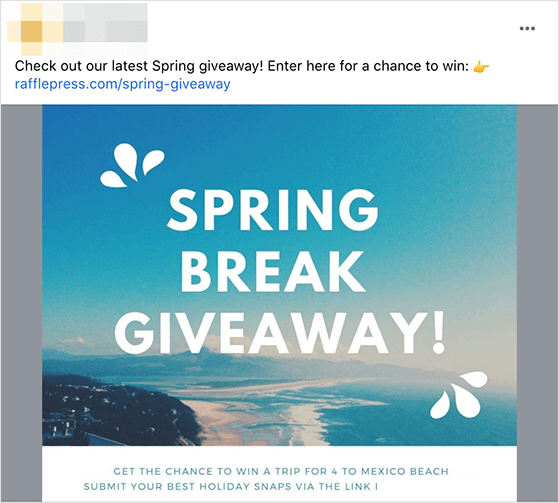
In the example below, a hotel asked people to share their favorite local features for a postcard, with a 3-course dinner for two as the prize.
3. Pick a Great Contest Prize
Your prize should be relevant to your business so you attract people who actually care about what you offer, not freebie hunters who unfollow the moment the contest ends.
A fitness brand offering a year of gym membership will pull in fitness enthusiasts who might become long-term customers. A generic cash prize pulls in everyone, which sounds good until you check who’s left a month later.

A few options that tend to work: trending products, store credit for eCommerce brands, or event tickets for local businesses. Match the value of the prize to the effort you’re asking for. For more, see these contest prize ideas.
4. Define Your Facebook Photo Contest Rules
You already have the full rules template above. This step is about generating a clean set inside your contest and protecting it from cheating.
RafflePress has a built-in rules generator. Enter a few details about your Facebook photo contest, and it creates your guidelines automatically.
How to prevent cheating in your photo contest. Fraud is a real concern once a prize has value. Multiple entries from the same person skew results and frustrate genuine participants.
RafflePress has tools for this. You can set entry limits per person, and it tracks IP addresses to flag submissions from the same device. I’d also moderate photo submissions before they go live, so you control quality and keep inappropriate content off the page.
For high-value prizes, avoid vote-only winner selection. A hybrid approach, where a panel reviews the top-voted entries and picks the winner, is far harder to game.
5. Create Your Facebook Photo Contest with RafflePress
You can run a giveaway directly on Facebook, but you get less control. Entries come in through post comments, which are hard to track and moderate, and the algorithm can limit who even sees your posts.
That’s why I use RafflePress. It’s a WordPress giveaway plugin that gives you a dedicated entry page, built-in fraud protection, and full control over submissions. This is the one place in this guide where the full build lives. The Instagram and selfie sections below point back here.

With the built-in Facebook giveaway template, you can get up and running in a few clicks.
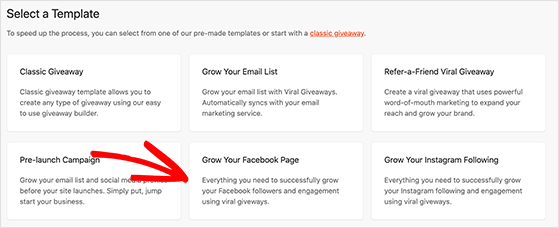
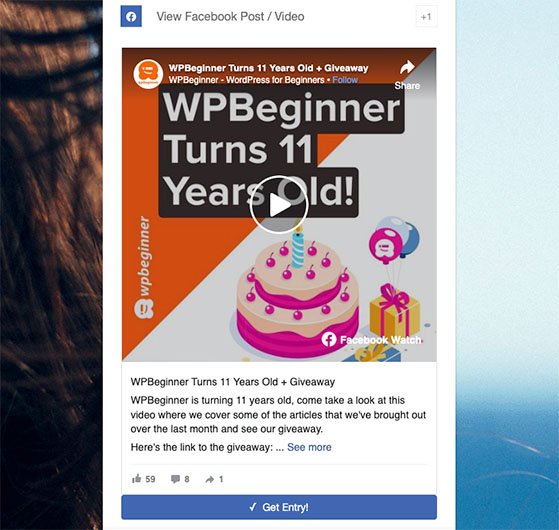
It automatically adds an action to view your Facebook page, which helps you get more fans. It also includes an action to view a Facebook post or video. Paste a post URL into the action, and RafflePress embeds it right inside the widget, so people can complete the action without leaving your site.
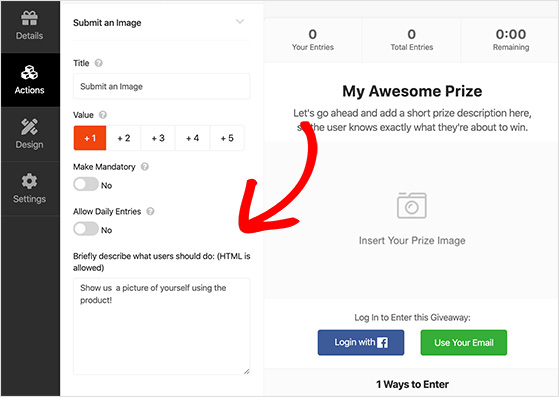
To collect the photos themselves, add the Submit an Image action from the giveaway editor. You can set how many entries it’s worth, make it mandatory, and allow daily entries. This is the same action you’ll reuse for selfie contests and standalone photo submissions later in this guide.
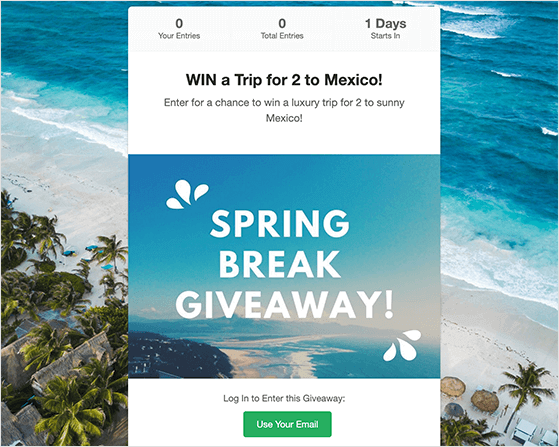
RafflePress contest pages are fully mobile-responsive too. Most Facebook users are on their phones, and a contest that breaks on mobile loses entries before people even start.
When you’re ready, publish your contest as a post, embed it with the RafflePress block, or put it on a distraction-free giveaway landing page. The landing page usually gets the most entries because there’s nothing else competing for attention.
6. Publish Your Photo Contest on Facebook
Once your contest lives on your website, share it on Facebook in one of two ways: post the link to your contest landing page, or post the URL of your contest blog post.
Either way, you’re doing two things at once. You’re engaging your Facebook audience with new content, and you’re sending traffic to your site where visitors can become customers.
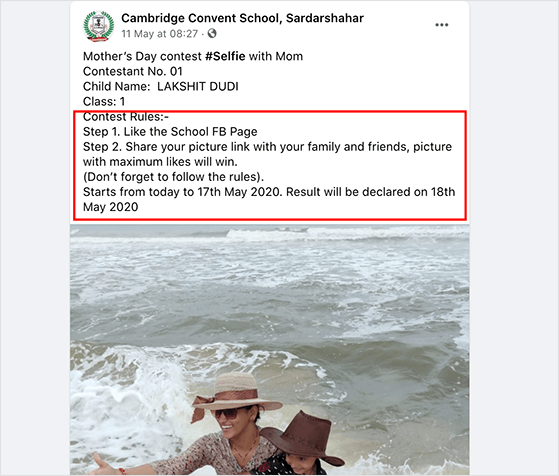
If you only run the contest inside a Facebook post, entries pile up in the comments and it gets confusing fast. Here’s what that looks like.

Compare that to a contest built with RafflePress, where people can see they just need to click the link to enter.
7. Promote Your Contest
Once your contest is ready, get the word out. A multi-channel push captures attention and sparks participation faster than posting once and hoping.
Start with your Facebook page. Regular posts keep the excitement alive and encourage shares. For an extra boost, targeted Facebook ads help you reach a broader but still specific audience.
Then promote everywhere else:
- Email newsletters: alert your subscribers with a clear call to action.
- Your website: use banners or popups to catch site visitors.
- Other social platforms: cross-post to X, Instagram, and LinkedIn to reach different audiences.
- In-store promotion: flyers or posters work if you have a physical location.
For more, see these proven contest promotion ideas.
8. Pick a Winner for Your Contest
How you pick a winner depends on the contest. Photo contests give you four options, each with a trade-off.
| Method | How it works | Best for |
|---|---|---|
| Random draw | RafflePress picks a winner automatically from verified entries. | Participation-based contests. The fairest, lowest-effort option. |
| Judge panel | You or a small group score entries against set criteria. | Contests where photo quality is the point. More credible, more work. |
| Public vote | Entrants promote their photo to gather votes. | Reach. Watch for vote gaming when stakes are high. |
| Internal selection | You review submissions and choose based on brand fit. | When you need specific types of UGC. |
Random draw is the simplest and fairest for participation-based contests. For a step-by-step walkthrough, see how to pick a winner for your giveaway.
9. Follow Up and Measure Your Results
After your contest ends and you’ve picked a winner, there’s still work to do. The follow-up is where you protect your investment and build momentum for next time.
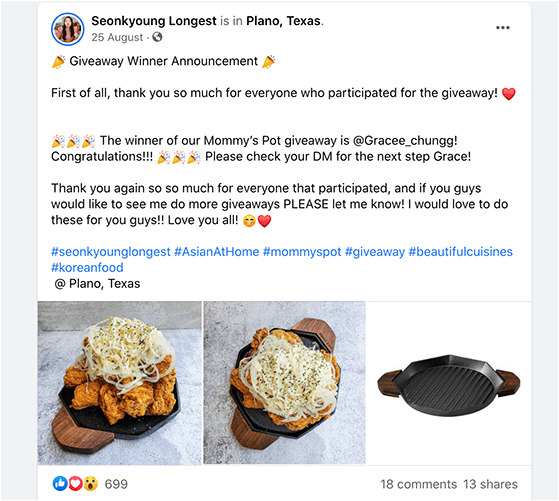
- Announce the winner publicly. Share the winning photo on Facebook, congratulate the winner by name, and tag them if you can.
- Thank everyone who entered. A brief thank-you post keeps goodwill alive for your next contest.
- Reuse the photos, with permission. Show the best entries on your site or social, but always get written consent first. A short message asking is enough. Don’t skip it.
- Keep people engaged. Follow up by email, offer non-winners a small discount, and start planning the next one using what you learned.
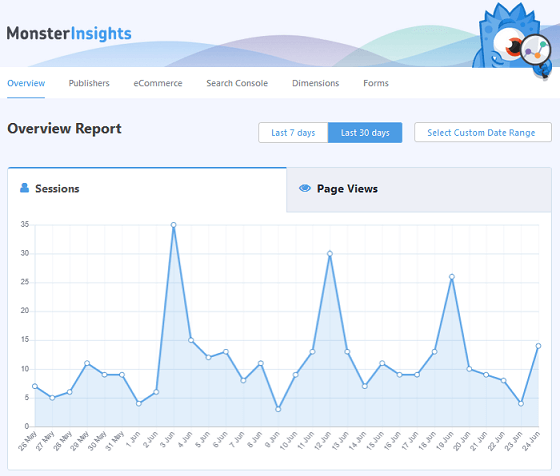
Measuring your results. The easiest way to track a contest is with MonsterInsights, the best Google Analytics plugin for WordPress. It shows visits to your giveaway page, referral traffic, and real-time stats without leaving your dashboard.
Tag every promotional link with UTM parameters, one per channel, so you can see which channel drove the most entries and lean into it next time.
Free: Download Our Giveaway Playbook
Templates, prize ideas, and promotion strategies in one guide.
How Do You Run a Photo Contest on Instagram?
Here’s the part worth knowing before you feel like you’re starting over: you’re not. The contest you built in Step 5 is the engine. Running it on Instagram, as a selfie contest, or as a plain photo submission just changes how people find it and what you ask them to send.
On Instagram, the model that works best is to run the contest on your own site with RafflePress, then use Instagram to drive people to it. That keeps every entry in one dashboard instead of scattered across hashtags and DMs.
Different platforms reward different formats. Here’s a quick guide to which one fits your audience.
| Platform | Best for | Format that works best |
|---|---|---|
| Visual brands, product showcases (18-34, lifestyle skew) | Hashtag submission or direct upload via RafflePress. Promote through Reels and Stories. | |
| Broad reach, community engagement (25-54) | Direct upload with a landing page link. Paid promotion offsets lower organic reach. | |
| TikTok | High-energy, viral contests (Gen Z and Millennial) | Photo-video hybrid challenges. Hashtag format spreads quickly. |
| X (Twitter) | Time-limited, retweet-driven contests (25-49) | Short-entry photo posts. Organic reach has declined since 2024. |
| Evergreen, image-collection campaigns (home, food, fashion) | Photo pin contests. Entries live longer here than elsewhere. |
For Instagram specifically, set up a branded hashtag before you launch, promote daily through Stories and Reels, and put your contest link in your bio since Instagram limits links in captions.
If your goal is broader Instagram growth rather than photo collection, our full guide on how to run an Instagram photo contest goes deeper on follower-focused tactics.
How Do You Run a Selfie Contest?
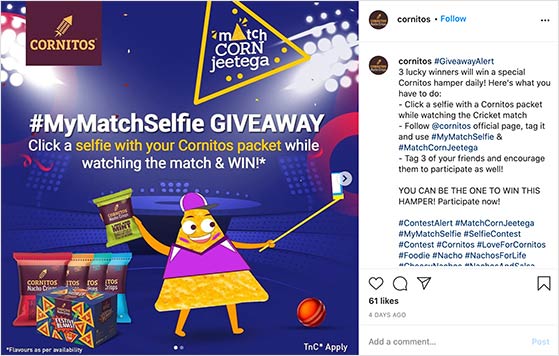
A selfie contest is the same contest with a tighter brief: people submit a selfie instead of any photo. It spreads well on Instagram, X, and Facebook, because a branded hashtag exposes your giveaway to a much wider audience.
The problem with relying on organic tags is that there’s no mechanism pulling people in. Ask 3,000 followers to tag you in a selfie and you might get three photos. A structured selfie contest changes that ratio by giving people a real reason to take and share the photo now.
Selfie Contest Theme Ideas
A good theme excites your audience and steers the kind of selfies you get. The work-from-home and employee angles are worth calling out, they consistently draw entries for team-based brands.

- Work-from-home or employee selfie contest
- Unboxing selfie contest
- First-day-of-school selfie contest
- Product or in-store selfie contest
- Group selfie or funny selfie competition
Selfie Contest Prizes and Rules
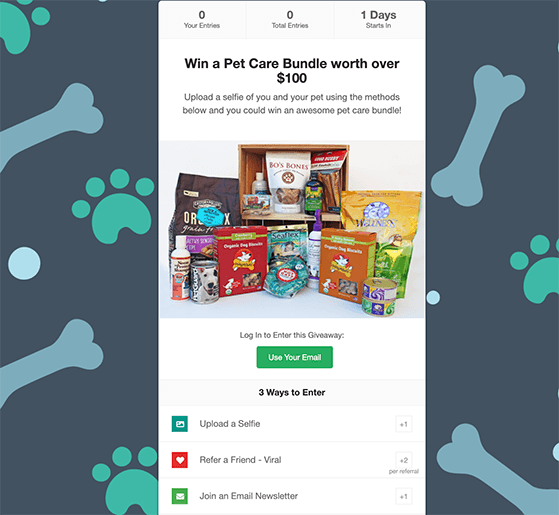
Pick a prize tied to your business so entrants stay interested after the contest. A pet brand running a pet selfie contest can reward the winner with a bundle of its own products, which keeps the new audience relevant.
Your selfie contest rules follow the same template from earlier in this guide. The one thing to add is a note on where and how people enter. Asking people to post selfies across social networks and tag you gets messy fast, because you then have to hunt through platforms and verify each entry by hand.
Collecting entries through the Submit an Image action on your own site avoids all of that. A simple printable poster or promo graphic with your hashtag works well for in-store or event selfie contests, too.
Build and Launch Your Selfie Contest
The build is the RafflePress setup from Step 5. Use the Submit an Image action, rename it to something like “Upload a selfie,” and add bonus actions like following your profile or referring a friend.
For promotion, set a branded hashtag before launch, post daily during the contest window, and send a final-push email 24 hours before it closes. That last email reliably drives a spike in last-minute entries.
How Do You Collect User-Submitted Photos on Your WordPress Site?
Everything so far has run through a contest. But sometimes you just want the photos, with no prize and no winner to pick: customers sharing product pictures, a community gallery, or guest submissions for your blog.
The catch is you don’t want to hand people access to your WordPress admin area just to upload a file. Here are three safe ways to collect photos on the front end of your site.
Method 1: Collect Photos Through a Contest (RafflePress)
If the photos are for a contest, the Submit an Image action you set up in Step 5 already does this. Entrants upload a photo through the giveaway widget, and you review every submission from the Image Entries screen in your dashboard.

One thing to know: contest image submissions don’t land in your WordPress media library. RafflePress stores them separately to keep your giveaway content organized.
Method 2: Let People Submit Photos With a File Upload Form (WPForms)
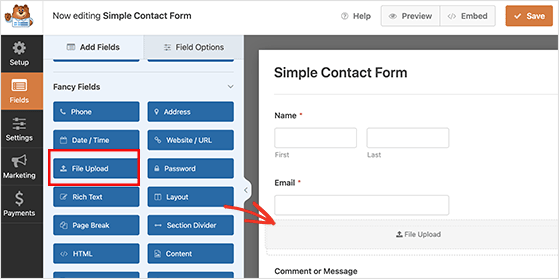
If you’re not running a contest and just want people to upload an image, a form is the simplest route. I use WPForms, a drag-and-drop form builder plugin for WordPress with a built-in File Upload field.
Create a form, drop the File Upload field onto it (you’ll find it under Fancy Fields), then click the field to edit it. Limit the accepted formats to JPG, PNG, and GIF so people can only send images.
In the field settings you can cap the file size and, under Advanced Options, switch between a modern drag-and-drop uploader and a classic file picker. There’s also a toggle to store uploads in your WordPress media library, which is handy if you plan to reuse the photos in posts.
Add the form to any page with the WPForms block, and people can start uploading.

Method 3: Accept Photos From Guest Authors (WPForms Post Submissions)
If you want people to submit a full post with a photo, like a guest article or a testimonial, use the WPForms Post Submissions addon. It needs WPForms Pro or higher.
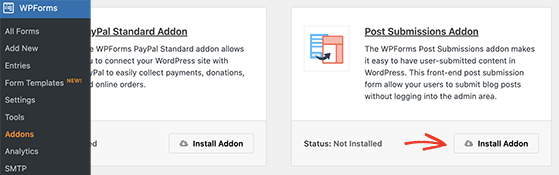
Install the addon, then create a form from the Blog Post Submission Form template. It comes with fields for the author details, post title, content, featured image, and category. Uploaded files land in your media library, and you can route submissions to an editor by adding their address in the form’s email notifications.
Facebook Photo Contest FAQ
How long should a Facebook photo contest run?
Run it for 1-2 weeks. That’s long enough for entries to build through shares and word-of-mouth, but short enough to keep urgency. Longer than two weeks and momentum usually drops, because people assume they have plenty of time and never get around to entering.
What should photo contest rules include?
Good rules spell out who can enter and any age or location limits, when entries open and close (with a timezone), the prize and its approximate value, how you’ll pick and notify the winner, and the rights you’re claiming over submitted photos. Add a platform disclaimer stating the contest isn’t sponsored by Facebook. The copy-ready template above gives you all of it.
Can you run a photo contest directly on Facebook without an app?
You can, but it’s harder to manage than it sounds. Entries come in through post comments, which are difficult to track and moderate, and Facebook’s algorithm may limit how many people see your post. A dedicated contest app like RafflePress gives you a proper entry page, fraud protection, and a clear submission process.
Do I need a separate tool to run a selfie contest?
Not strictly, but running one directly on Instagram means manually searching for hashtag posts, verifying each entry, and tracking follows and tags by hand. A tool like RafflePress collects entries, verifies them, and picks a winner automatically inside WordPress, and gives you a landing page so your contest isn’t buried in a feed.
How do I let people upload photos to my WordPress site without a contest?
Use a file upload form. WPForms has a drag-and-drop File Upload field you can limit to image formats, add to any page with a block, and optionally store in your media library. For full posts with a photo, the WPForms Post Submissions addon accepts guest submissions without giving anyone admin access.
Run a Photo Contest on Your Own Terms
You now have a plan for a photo contest that gets entries, stays compliant with Facebook’s rules, and works just as well on Instagram or as a selfie contest. You’ve also got two ways to collect photos without a contest at all.
You don’t need to build any of it from scratch. RafflePress handles the entry collection, fraud protection, and mobile experience, so you can focus on promoting the contest and picking a great winner.
Start your first photo contest right now.
If you liked this article, please subscribe to our YouTube Channel for RafflePress video tutorials. You can also find us on Twitter and Facebook.


