How to Create a Multi-Step Form in WordPress (Without Coding)
 Stacey Corrin
Stacey Corrin
Stacey Corrin
 John Turner
John Turner
John Turner

TL;DR: How to Create a Multi-Step Form in WordPress
Yes, you can create a multi-step form in WordPress without any coding. WPForms makes it simple in about 10 minutes.
- Install WPForms – Start from a template in your WordPress dashboard.
- Add Page Break fields – Drag the Page Break field between form sections to split them into steps.
- Customize the progress bar – Choose a connector, circle, or bar style to show users where they are.
- Configure general settings – Set the form name, spam protection, and submit button text.
- Set up notifications – Choose who gets email alerts when the form is submitted.
- Choose a confirmation – Decide what users see after completing your form.
- Embed on your page – Add the WPForms block to any WordPress page or post.
If you have ever built a contact or registration form and watched your completion rate drop, the issue is not the questions. It is showing all of them at once.
Multi-step forms break that into smaller sections, so visitors see a few fields at a time instead of a wall of inputs. I’ll show you how to create one in WordPress using WPForms, no coding required.
- What Is a Multi-Step Form in WordPress?
- How to Create a Multi-Step Form in WordPress
- Step 1: Create a New Form in WordPress
- Step 2: Split Your Form into Multiple Steps
- Step 3: Show and Customize Your Multi-Page Form Progress Bar
- Step 4: Configure Your Multi-Step Form Settings
- Step 5: Set Up Your Multi-Step Form Notifications
- Step 6: Choose Your Confirmation Message
- Step 7: Add Your Multi-Step Form to WordPress
- Can You Use Conditional Logic in a Multi-Step Form?
- Can Users Save Progress and Return to the Form Later?
- Use Multi-Step Forms With Your RafflePress Giveaway
- When Should You Use a Multi-Step Form in WordPress?
- Create Multi-Step Form in WordPress FAQs
What Is a Multi-Step Form in WordPress?
A multi-step form is a web form divided into separate sections, sometimes called a form wizard or multistep form. A progress bar typically shows users how far they are from the end.
Multi-step forms reduce the fatigue that comes from filling in long single-page forms. When users only see a few fields at a time, they are more likely to finish.
Adding more steps to a form might seem counterintuitive. If there are more steps to take, wouldn’t it put people off completing it?
A multi-step form can have the opposite effect and increase your form conversions, especially if it has more than 3 form fields.
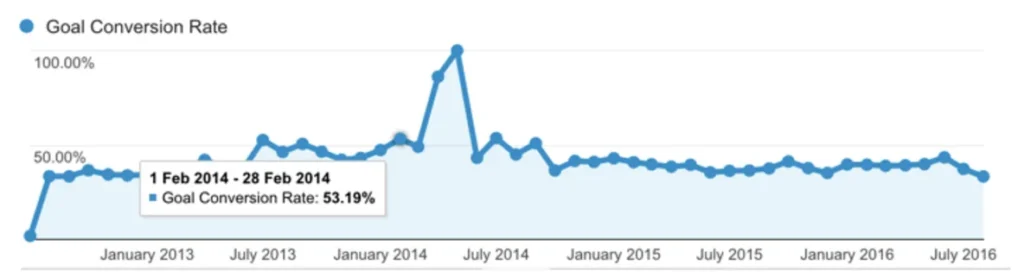
Take WhatIsMyComfortZone.com, for example. They converted 53% of visitors into leads by breaking their form into multiple parts.
Aside from increasing conversion rates, multi-step forms can also:
- Improve focus: When you break down form questions, you can group them into specific topics to help users focus.
- Minimize form abandonment: Website visitors are more likely to complete your form when you break it down into manageable pages rather than a single long form.
- Increase trust: You can create multi-step forms using conditional logic to show different pages based on the user’s answers. This ensures you only collect the information you need, making users more confident about sharing personal data.
Now that you know the benefits of creating a multipart form in WordPress, let’s look at the steps to build one for your website.
How to Create a Multi-Step Form in WordPress
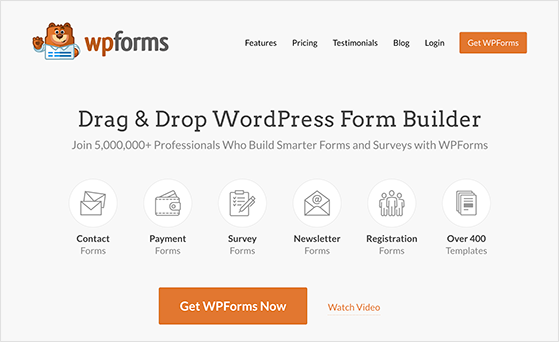
The easiest way to create a multi-step form in WordPress is with one of the many WordPress plugins available. The best tool for the job is WPForms, the best WordPress contact form plugin.
WPForms is the most beginner-friendly form builder plugin and is active on over 6 million websites with over 12,500+ 5-star ratings on WP.org.
It allows you to create a WordPress form for almost any purpose without code. For instance, you can create user-friendly registration forms, signup forms, survey forms, file-upload forms, order forms, and application forms.
This plugin comes with an easy drag-and-drop form builder and various form templates to make creating your forms a breeze. It also offers add-ons for payment processors like Stripe and PayPal, allowing you to accept payments on your WooCommerce store.
Similarly, the builder works seamlessly with popular WordPress page builder plugins like Elementor, Divi, and SeedProd. That way, you can display forms on the front end of your site without writing code or CSS.
Why not check out our WPForms review to see all the details?
The free version of WPForms has all the necessary features to make a simple contact form. Yet, to enjoy advanced functionality such as conditional logic, survey forms, advanced form templates, and multi-step forms, it’s best to use WPForms Pro.

I’ll use the pro version of the contact form plugin for this tutorial, which has everything you need to create a multi-step form in WordPress.
Let’s get started.
Step 1: Create a New Form in WordPress
You first need to install and activate the WPForms WordPress form builder plugin on your website. Click here to get started with WPForms, and if you need a little help, you can learn how to install a WordPress plugin here.
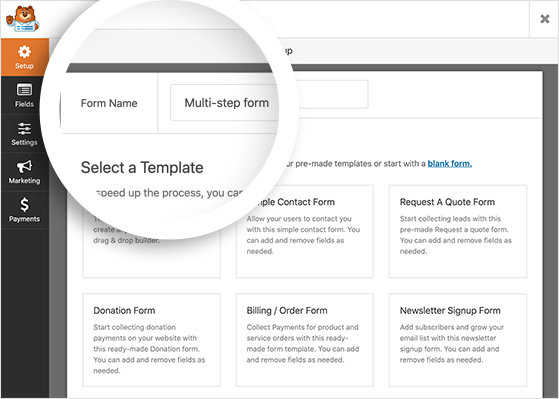
Once WPForms is installed, navigate to WPForms » Add New from your WordPress dashboard. This reveals the form templates page, where you can choose various form types.
It’s easy to split any form into a multi-step form with WPForms, so let’s look at how to do that with a contact form.
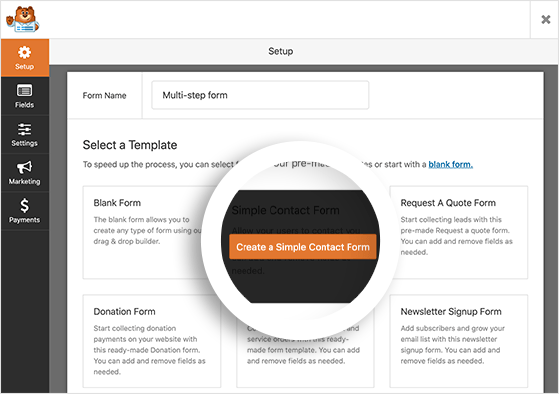
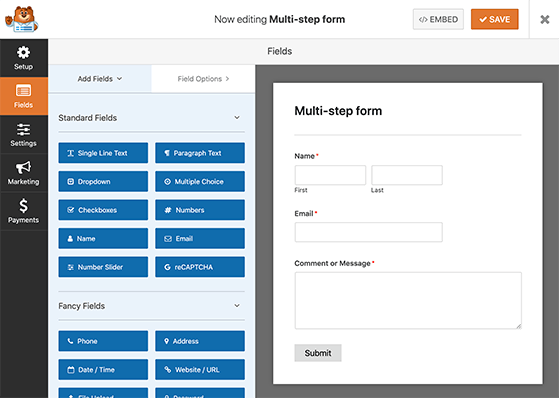
Give your new form a name and click the Simple Contact Form template.
After clicking, WPForms will load your template into the drag-and-drop form builder.
You’ll see that your simple contact form already has the Name, Email, and Comment or Message form fields. You can change the fields’ order by clicking, dragging, and dropping them anywhere on your form.
It’s also easy to add extra text fields to your form by dragging them from the left-hand panel and dropping them onto the right. You can indicate required fields by clicking a field and adjusting the settings.
When you’re happy with your fields and their position, click Save and move on to the next step.
Step 2: Split Your Form into Multiple Steps
You need to use the Page Break form field to split your multipart form into different stages.
To do this, navigate to the Fancy Fields section in the left-hand panel. Then click the Page Break field and drag it to your form.
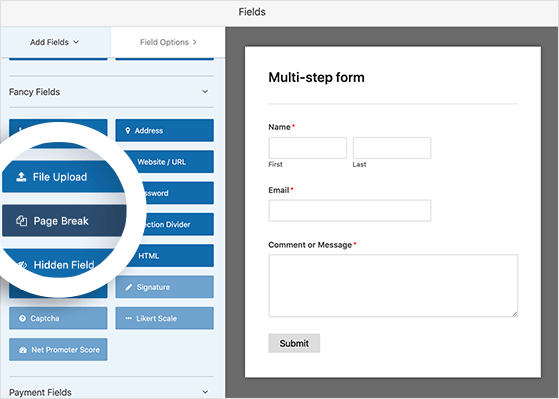
You can then put the Page Break where you want your form to split.
Repeat those steps for where you want your form to break into another page. After that, you can add additional fields to those sections to complete your form.
You can create as many form pages as you like in WPForms. However, it’s best not to overwhelm your visitors. Try to include only the information you most need. You can always collect more details later.
Step 3: Show and Customize Your Multi-Page Form Progress Bar
You might wish to show a progress bar on your forms based on your business and website needs. Progress indicators, sometimes called a form stepper, tell users which stage they’re at in your form and how much time it will take to complete it.
Since most people don’t like leaving things half-finished, showing users their progress is an excellent way to spur them into finishing and submitting your form.
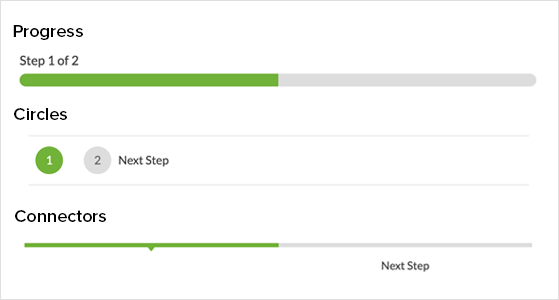
WPForms has 3 different progress bars you can add to your multi-part form, including:
- Connectors: A breadcrumb-style bar showing a connecting bar with page titles for each form section.
- Circles: Individual circles with titles for each form step.
- Progress Bar: Shows users’ progress through your form with a partially colored bar.
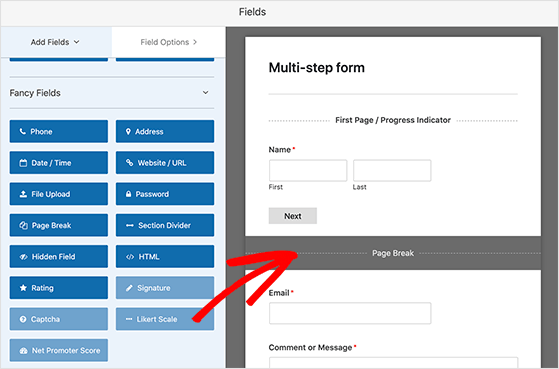
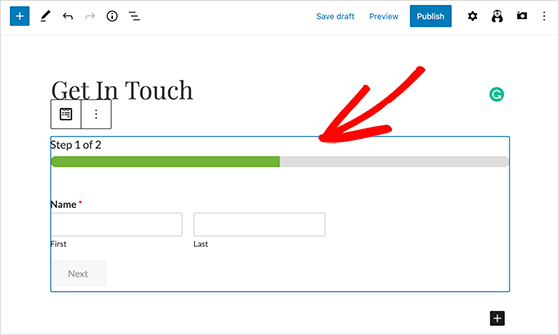
Click on the First Page break section to display and customize the progress bar on your multi-step form.
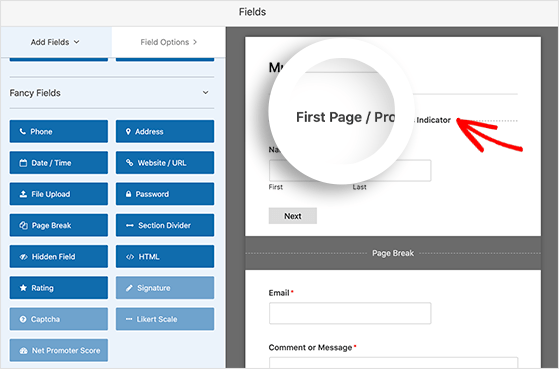
You’ll then see a new panel in your form builder to choose your progress indicator style and color.
If you choose the Connectors or Circles progress indicator style, you can also change the page title to show users which stage they are in your form.
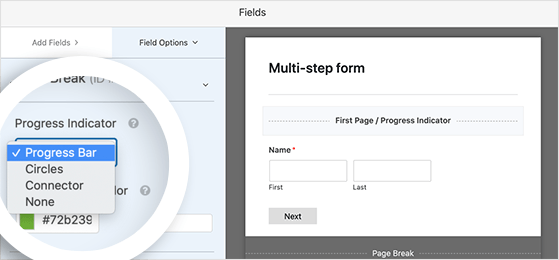
The Progress Bar style offers a regular progress bar guiding users through the steps left to complete your form.
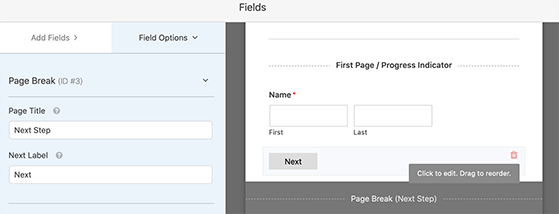
To customize the Next Page title and Next button that takes users to the following form section, click the Page Break section you inserted into your form during setup. The customization options will appear in the left-hand panel of the form builder.
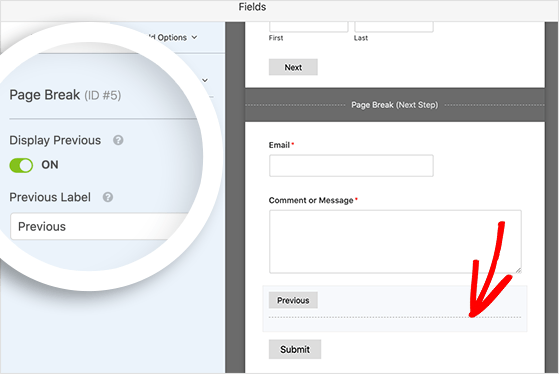
You can also add a Previous button for users to go back to the page before. To do that, turn the Display Previous checkbox to the On position. You can also change the title for that button when you do that.
When you’re happy with your page breaks and progress indicators, click the Save button.
Step 4: Configure Your Multi-Step Form Settings
In this step, we’ll look at the settings for your multi-part form. First, click the Settings tab and select the General option.
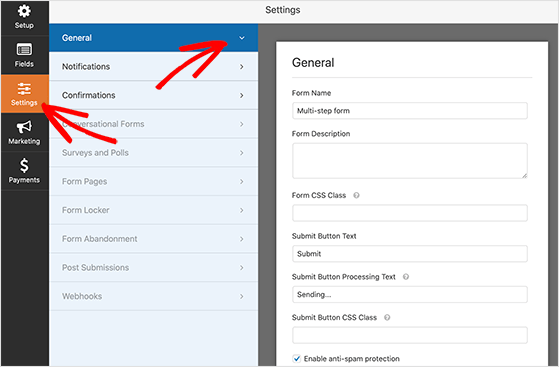
You can give your form a new name and description on this screen, customize the submit button, and enable anti-spam features such as Google Recaptcha.
You can also enable AJAX settings and disable storing information to comply with GDPR requirements.
Remember to click Save when you’re happy with your settings.
Step 5: Set Up Your Multi-Step Form Notifications
Now click the Notifications section on the left-hand side of the settings page. That section is where you can configure notifications for your multi-page form.
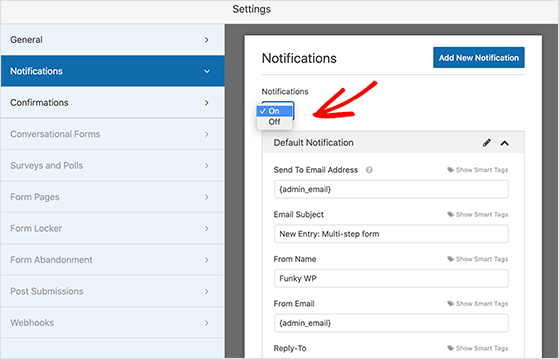
Form notifications are emails sent to you whenever users submit a form on your website. Notifications are turned on by default in WPForms, so if you don’t wish to receive email notifications, choose Off from the dropdown menu.
You can also use Smart Tags to send an email to each user’s email address after submitting a form. This is an excellent way to reassure users that you’ve received their responses.
Many users will appreciate this after taking the time to fill out a form with multiple stages. Otherwise, it could leave them wondering if the form went through correctly.
If you need help with this step, you can view the WPForms documentation on setting up form notifications.
After setting up your form notifications, click Save.
Step 6: Choose Your Confirmation Message
The next step is to choose the confirmation messages for your multi-stage form. Click the Confirmations heading on the Settings page to reveal the options.
Form confirmations let users know their form was submitted correctly and allow you to tell them the next steps they should take.
In WPForms, there are 3 confirmation types you can choose:
- Message: This is the default confirmation type and shows a simple success message when users submit their form.
- Show Page: This confirmation type takes users to a different page on your website, such as a thank you page.
- Go to URL (Redirect): With this confirmation message, you can send users to a page on a different website from yours.
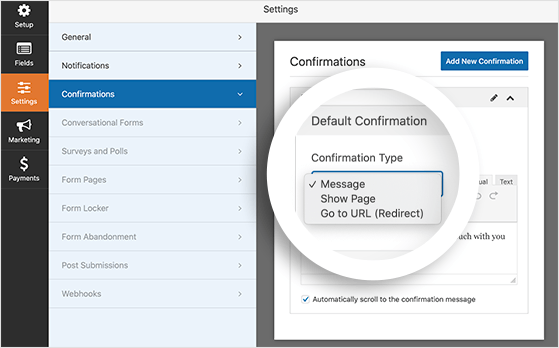
Now choose your preferred confirmation type from the dropdown menu, then customize it with your message or URLs.
When you’re happy with how everything looks, click Save.
Step 7: Add Your Multi-Step Form to WordPress
Once you’ve created your multi-step form, it’s time to add it to your WordPress website. With WPForms, you can add your form to various places on your website. For example, a page or post, a sidebar, or inside your WordPress theme with a shortcode.
The most common placement is to embed your form in a WordPress post or page, so let’s look at how to do that here.
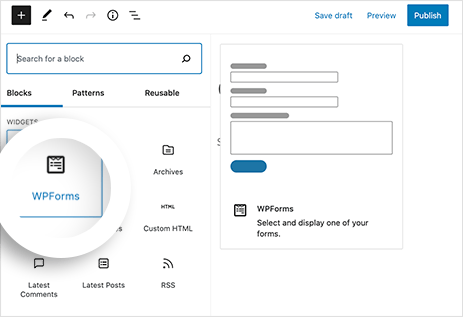
First, create a new post or page in WordPress, or you can click Edit on an existing one. Once inside the WordPress editor, click the plus (+) icon to add a new content block.
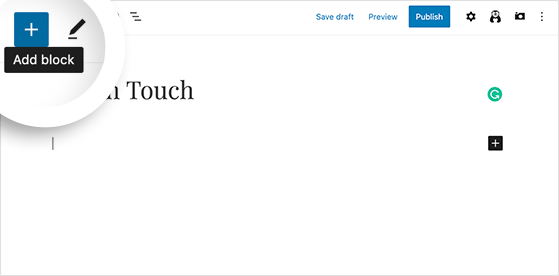
Scroll down the popup menu to the Widgets heading and click the WPForms widget to embed the block into WordPress.
Next, click the dropdown menu and select your multi-step form.
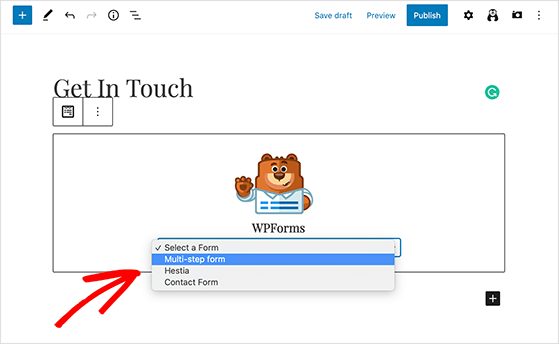
WPForms will display the form inside your WordPress editor so you can preview how it looks before publishing.
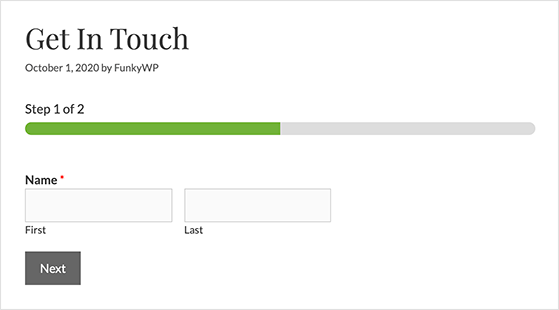
The final step is to click Publish or Update to make your form live. WPForms multi-step forms are fully responsive on mobile, so they’ll work across all devices. Here’s an example of how it will look to your users:
Free: Download Our Giveaway Playbook
Templates, prize ideas, and promotion strategies in one guide.
Can You Use Conditional Logic in a Multi-Step Form?
Yes. WPForms lets you show or hide entire form pages based on what a user selects on a previous step.
For example, if a visitor selects “Business” as their account type on step 1, you can show a “Company Details” page on step 2. If they select “Personal,” that page never appears.
I use conditional logic on longer intake forms to keep each step relevant to the specific user. It reduces how many questions the average visitor sees and cuts mid-form drop-offs noticeably.
To set it up, click any field in the WPForms builder and look for the Smart Logic panel in the left-hand settings area.

Can Users Save Progress and Return to the Form Later?
Yes. WPForms Pro includes a Save and Resume feature that lets users save their place mid-form and return to finish it later.
A saved-progress link is sent to their email so they can pick up exactly where they left off. This is especially useful for longer intake forms, job applications, and multi-step survey flows where users may not have all the information ready in one sitting.
Use Multi-Step Forms With Your RafflePress Giveaway
RafflePress handles your giveaway entry widget, but once someone enters, you can redirect them to a custom confirmation page to collect more information.
I set this up by pointing RafflePress’s confirmation redirect to a page with a WPForms multi-step form.

Step 1 collects prize delivery details like a shipping address, and step 2 includes a short optional survey or preference question.
By the time visitors reach that page, they have already committed to entering and are far more likely to complete the extra steps. It keeps the giveaway entry itself fast and simple in RafflePress, while WPForms handles the additional collection separately.
When Should You Use a Multi-Step Form in WordPress?
Multi-step forms work best when you need to collect several pieces of information but a single-page form would feel overwhelming. Here are the situations where they make the biggest difference:
- Contact forms with 5 or more fields – Splitting a long contact form keeps the experience manageable and reduces abandonment.
- Giveaway entry forms – Collect basic details on step 1 and optional bonus entries on step 2.
- Event registrations – Separate personal details, dietary preferences, and payment onto different pages.
- Job applications – Break resume uploads, work history, and references into distinct sections.
- Lead qualification surveys – Ask qualifying questions on step 1 before showing pricing or contact info on step 2.
- Quiz funnels – Guide users through a sequence of questions with personalized results at the end.
Create Multi-Step Form in WordPress FAQs
What is the best free plugin for multi-step forms in WordPress?
WPForms Lite includes a basic multi-step form option, but the progress bar customization and advanced page break controls are available in WPForms Pro. If you need a fully free starting point, WPForms Lite is the easiest option. You can upgrade later to unlock conditional logic and save-progress features.
Can I add conditional logic to a multi-step form in WordPress?
Yes. WPForms Pro includes Smart Logic, which lets you show or hide entire form pages based on a user’s previous answers. For example, you can show a business details page only when someone selects “Company” on the first step. This keeps each step relevant and reduces the number of questions the average user sees.
How do I add a progress bar to a WordPress multi-step form?
Click the first Page Break field in the WPForms builder. The left panel shows three progress indicator options: Connectors, Circles, or a standard Progress Bar. Choose a style, set the colors, and add page titles so users know which stage they are on. The changes save automatically when you click Save in the form builder.
Can visitors save their progress and return to a multi-step form later?
Yes. WPForms Pro includes a Save and Resume feature. When enabled, users can save their form mid-way and receive an email link to continue from the same point. This is especially useful for longer forms like job applications or intake surveys where users may not have all their information ready at once.
Do multi-step forms work with page builders like Elementor or SeedProd?
Yes. WPForms works with Elementor, Divi, and SeedProd. You can embed any WPForms multi-step form on a page built with these tools using the WPForms block or a shortcode. SeedProd is especially useful for building a standalone landing page for your giveaway entry form or lead capture flow.
If you are running a contest or giveaway, pair your multi-step form with RafflePress to collect entrant details in stages and keep more visitors engaged through the process. Get RafflePress today.
While you’re here, you might also like this comparison of the best lead-generation tools to grow your business.
If you liked this article, please subscribe to our YouTube Channel for RafflePress video tutorials. You can also find us on Twitter and Facebook.

