New Update: Boost Social Proof with Reviews & Automation
New Update: Boost Social Proof with Reviews & Automation

 John Turner
 John Turner
Want to know a great way to get feedback from your customers? Surveys are it.
We use them ourselves, right here on our website, to understand which features our users love and what they’re hoping to see next. This direct feedback helps us make smart, data-driven decisions to grow our brand and keep our users happy.
Now, you might be thinking that adding surveys to your website is a lot of work. That’s what I thought at first, too. But actually, it’s much simpler than you might expect. With a WordPress survey plugin, you can easily embed surveys on your site without needing to write any code. And that’s what I’m going to show you how to do in this guide.
I’ll take you through the steps of creating a feedback survey in WordPress, so you can start getting useful insights from your audience right away.
Creating an online survey on your WordPress website is an easy way to gather feedback directly from your target audience. This allows you to solve any problems your visitors face, fix things about your business they don’t like, and provide more of what they love.
While there are many online alternatives to Google Forms and Survey Monkey, using a survey plugin to embed questionnaires in WordPress keeps website visitors right where you want them – on your website.
That way, they’re more likely to interact more with your website, complete your survey, and browse your products or services.
You might also want to create a survey on your website to:
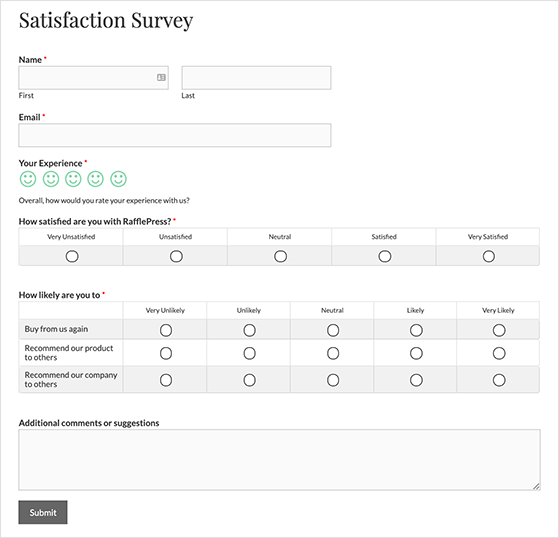
Bottom Line: Adding a survey to your website is an inexpensive, flexible, and more reliable way to get the feedback you need to improve your business. Plus, when you use the Surveys and Polls addon for the WPForms plugin, they’re easy to set up and run.
Why not check out our detailed WPForms review for more details?
Below, I’ll show you all the steps I use to create an online WordPress survey using WPForms, the most beginner-friendly drag-and-drop form builder for WordPress.
It has over 6 million users, and easy and powerful features, including:
Follow the steps below to create a survey on WordPress.
The first step in creating an online survey is to install and activate the WPForms plugin. If you need help with that, you can follow this step-by-step guide to install a WordPress plugin.
After that, you need to install the WPForms Surveys and Polls addon to use the plugin as your survey software.
To activate the addon, navigate to WPForms » Addons from your WordPress admin area. Then find the addon called Surveys and Polls Addon.
Click Install Addon, then click Activate.

With the addon activated, you’re ready to create a new form.
WPForms comes with various contact form templates and form fields that allow you to customize your survey form. For instance, you could create a donation form with star ratings, a registration form with a Likert scale, and more.
For this guide, I’ll create a survey-specific WordPress form with everything you need to run an online survey in an easy-to-use package, including multiple-choice questions.
More importantly, your survey will look great on desktop and mobile devices due to its mobile-friendly design.
To get started, go to WPForms » Add New. This opens a popup where you can give your form a name and choose a form template.
For this guide, pick the Survey Form Template.
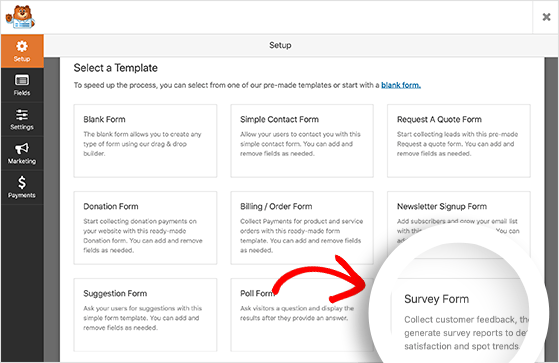
WPForms will now create your form and show it in the visual form builder.
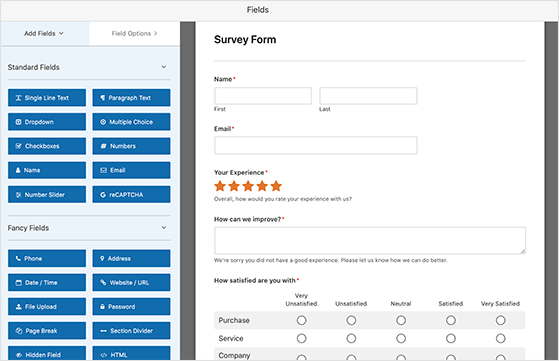
By default, your form has the following fields:
This offers a great place to start, with the ability to customize the design and questions based on the kind of information you need.
Adding extra fields to your form is easy. Just drag them from the left-hand panel and drop them onto your form in the right-hand panel. Then click the field to edit the contents.
If you like, you can re-arrange form fields by clicking and dragging them to your preferred position.
Let’s take a closer look at editing fields by customizing your form’s Rating field.
First, click the rating field on your form to open the customization options in the left-hand panel. Here you can change the label and give it a description that tells respondents why you need their rating.
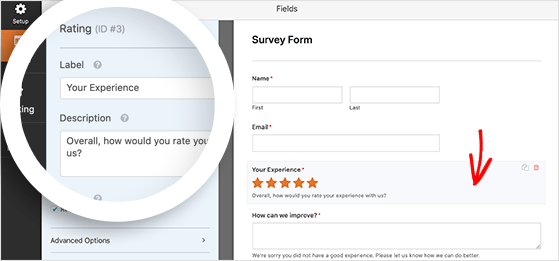
You can then choose the rating scale from 2 to 10 using the dropdown menu and mark the rating as required.
Clicking the Advanced Options heading allows you to:
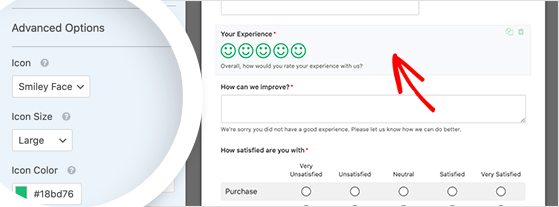
Now let’s explore how to customize your form’s Likert scale field.
Customizing the Likert scale on your survey form is similar to the rating field. Just click the field in the form builder to show the customization options in the left-hand panel.
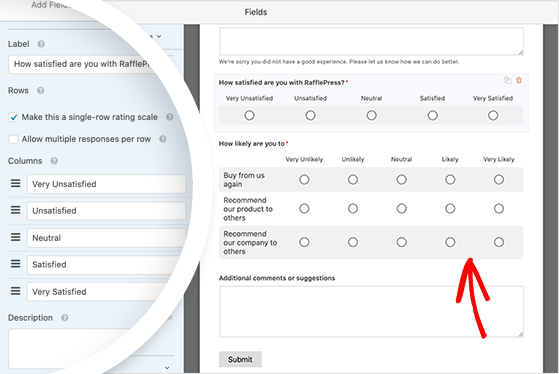
In the customization panel, you can make the following changes:
For more help, see the WPForms documentation on customizing the Likert scale field.
To take your customer satisfaction survey to the next level, you can use the Net Promoter Score (NPS) field to create a Net Promoter Score survey in WordPress.
A Net Promoter Score is a loyalty and satisfaction measurement of how likely customers are to recommend your products or services on a scale of 0-10. You can then use the results as a prediction of your business growth.
When you’re happy with your WordPress form customizations, click the Save button.
You need to enable form reporting in your settings to collect real-time results when users complete your form.
Click the Settings tab in your form builder, then click the Surveys and Polls heading. Now, click the Enable Form Reporting checkbox to enable sitewide survey reporting.

WPForms can now collect survey results data for all your website’s forms with the following fields:
If you used the Survey Form template as we did earlier, this setting is enabled by default. Yet, if you use a different template, you’ll need to enable it manually.
If you don’t want to enable reporting for every form on your website, unclick the Enable Survey Reporting checkbox.
Afterward, return to your form editor and click the specific field you’d like to enable reporting for. Then, under the Advanced Settings heading, tick the Enable Survey Reporting checkbox.

Now, WPForms will only collect survey results for that particular form field. Repeat this process for each field you wish to gather results for, and remember to click Save when you’re done.
Your WordPress survey form has 3 different settings for you to configure, which we’ll detail below.
General Settings
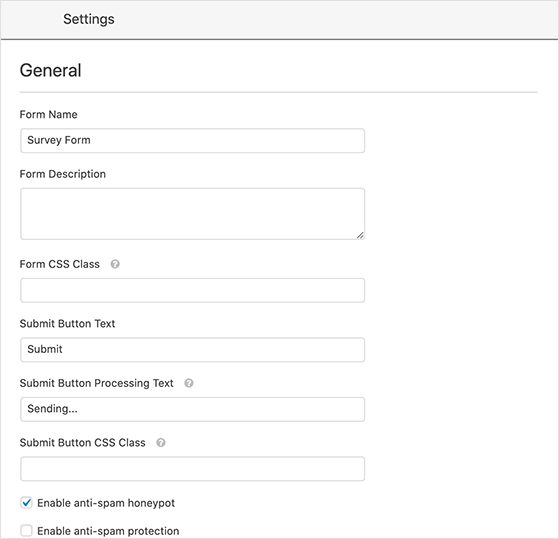
You can change your form name and description in the General Settings section, customize the submit button CSS and enable anti-spam features. You can also disable storing entry information in WordPress to help your site comply with GDPR.
Notification Settings
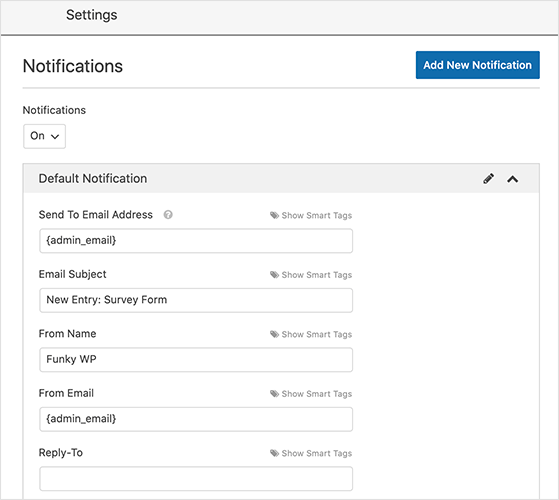
In this area, you can enable or disable form notifications. This allows WPForms to email you whenever someone submits a survey on your WordPress website. If you use HTML Smart Tags, you can also send an email to users to confirm you received their form. You can learn more about smart tags in the documentation.
Confirmation Settings
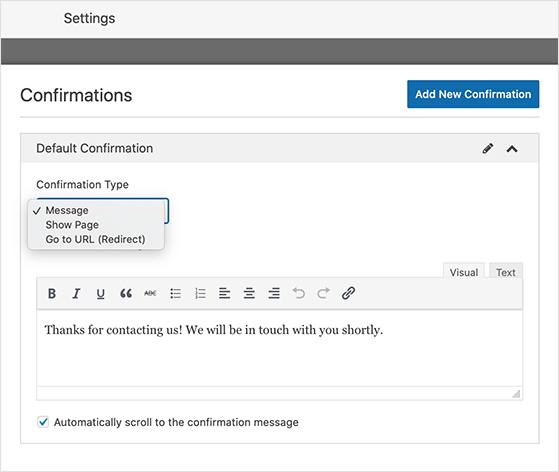
After users complete your survey, you can show them a confirmation message to reassure them it went through. If you prefer, you can send users to another page on your website, like a thank you page, or redirect them to a different website altogether.
Don’t forget to click Save after configuring your survey form settings.
WPForms offers various ways to embed a survey on your website. You can embed it in a WordPress post or page using the block editor or even in your sidebar using the WPForms WordPress widget.
The most popular place to embed a survey form is on a new page, so let’s look at how to do that.
First, create a new page in WordPress and give it a page title. Next, click the WordPress editor’s plus (+) icon to add a new content block.
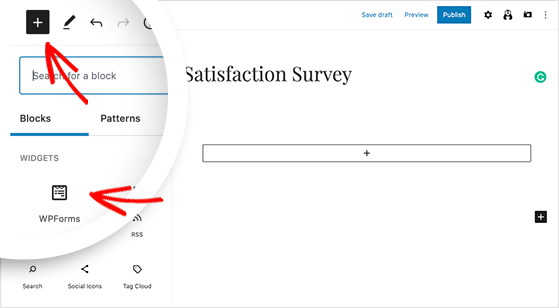
Scroll down to the widgets section and click the WPForms WordPress block to add it to the editor.
Next, click the dropdown menu inside the WPForms block and select the survey form you recently created.
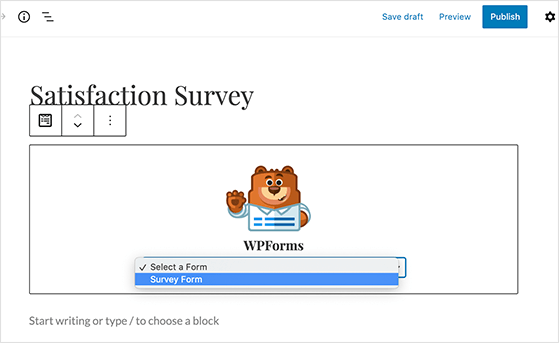
Your survey form will now appear inside the WordPress page editor, previewing how it will look.
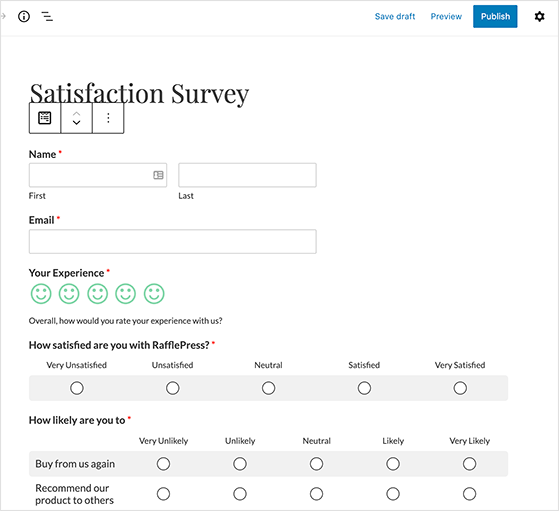
Now all that’s left is to publish your page and see how it looks live on your website.

Congrats! You now know how to add a survey to your WordPress website. Now let’s explore how to view your survey results.
As users start completing your survey, it’s easy to see the collected data with reports.
To generate a report, go to WPForms » All Forms and hover your mouse over the form to display the options. Then, go ahead and click the Survey Results link.
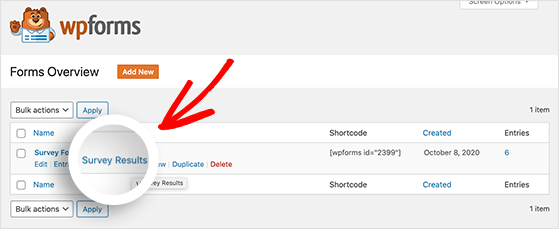
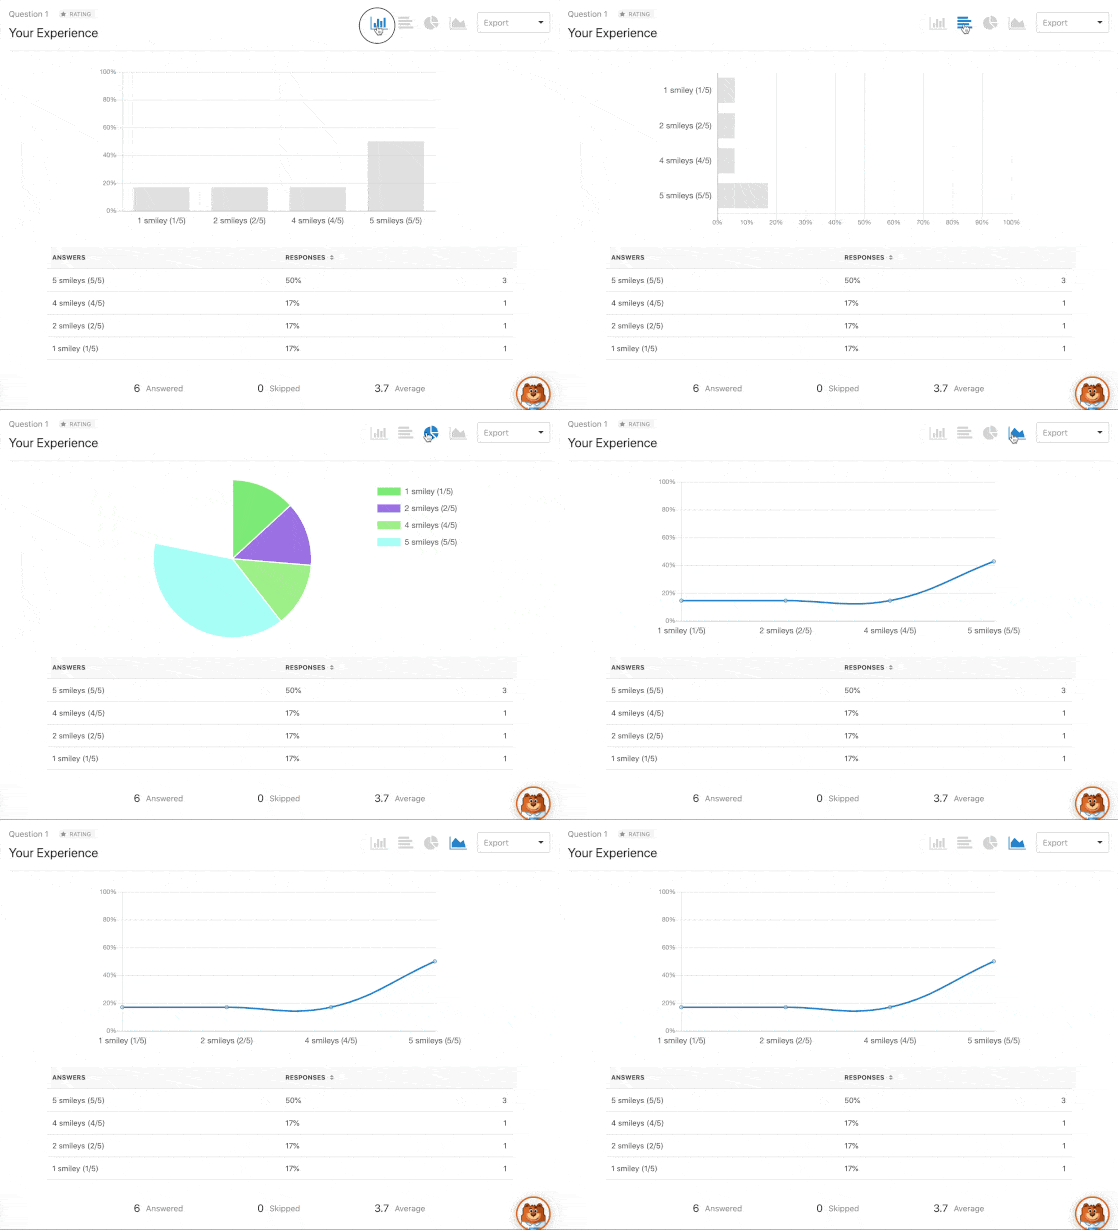
WPForms will show results for each form field that you enable reporting for.
With the rating field report, you can view your results as a bar, pie, or line chart:
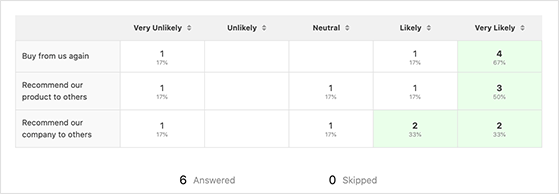
And here’s what your Likert scale survey report might look like:
It’s also possible to export your survey results as a CSV file or print them from inside WordPress.
Did you know you can get more data about file uploads with MonsterInsights, the best Google Analytics plugin for WordPress? For more details, take a look at our MonsterInsights review.

Looking for another excellent survey solution for WordPress? Allow me to introduce you to UserFeedback. This powerful plugin makes creating and managing surveys a breeze, even if you’ve never written a line of code in your life.
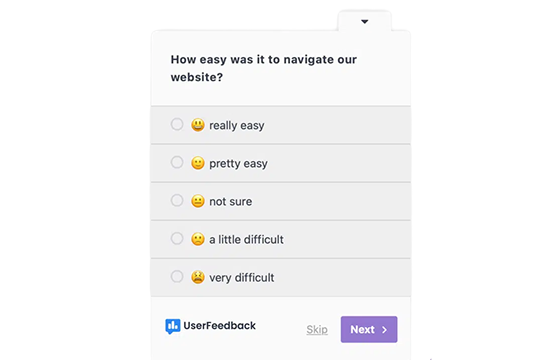
What sets UserFeedback apart is its combination of user-friendly design and robust features. With its intuitive interface, you can quickly create engaging surveys and add them anywhere on your site.
Here are the standout features that make it worth considering:
Whether you’re gathering customer feedback or conducting market research, UserFeedback offers a compelling alternative for WordPress users seeking a straightforward yet powerful survey solution.
Check out the list of powerful UserFeedback features, or get started today.
And there you have it!
I hope this article helped you learn how to create a survey on WordPress. All that’s left is to gather better customer feedback with your forms and use that data to improve and drive your business growth.
To discover even more great tools for your website, check out this list of the best WordPress plugins to grow your business.
If you liked this article, please subscribe to our YouTube Channel for RafflePress video tutorials. You can also find us on Twitter and Facebook.
Disclosure: Our content is reader-supported. This means if you click on some of our links, then we may earn a commission. We only recommend products that we believe will add value to our readers.
Copyright © 2024 SeedProd LLC. RafflePress® is a registered trademark of SeedProd LLC