New Update: Boost Social Proof with Reviews & Automation
New Update: Boost Social Proof with Reviews & Automation
 John Turner
 John Turner
I used to think adding a calendar to my WordPress site would be way too technical. I figured I’d need to mess with code, tweak a bunch of settings, or hire someone to do it for me.
But after trying a few plugins, I found Sugar Calendar, and it completely changed the game. Within minutes, I had a clean, easy-to-use calendar on my site that showed off upcoming webinars, promotions, and events without slowing anything down.
In this guide, I’ll show you how to make a calendar in WordPress using Sugar Calendar. Whether you’re running online classes or in-person events, this simple calendar will help you stay organized and make it easier for your visitors to plan ahead.
Quick Summary: How to Make a Calendar in WordPress
If you’re running giveaways to grow your audience, adding a calendar is one of the best ways to keep people engaged between promotions.
I started using a calendar on my site after running a few contests with RafflePress. What I noticed was that people didn’t just want to enter once. They wanted to know what else was coming up. When I added a calendar to highlight launch dates, live streams, and upcoming giveaways, I saw more return visits and repeat entries.
Here’s why it helps:
When you combine RafflePress with a simple calendar plugin like Sugar Calendar, you can manage both giveaways and events in one place. It’s a great way to stay organized and grow your site without adding more to your to-do list.
Sugar Calendar is the best all-in-one events and booking calendar plugin for WordPress. It’s lightweight, user-friendly, and easy for beginners without writing HTML or CSS code.
The user interface is easy to navigate, allowing you to create, edit, and manage your calendars with minimal fuss. It lets you make weekly, monthly, and daily calendars for various events, such as live streams, online courses, webinars, church sermons, film screenings, and more.
Sugar Calendar also includes the following functionality:
You can integrate Sugar Calendar with 3rd-party services like Google Calendar and Apple’s iCal to synchronize events with your WordPress calendar. It also works seamlessly with the best WordPress plugins, such as WPForms for event registration forms and SeedProd for custom event landing pages.
Even better, the Event Ticketing add-on allows you to sell event tickets from your WordPress site via the Stripe payment gateway and WooCommerce. With the Event Ticketing add-on, you can turn your calendar into a full event booking calendar for WordPress.
Here are some other add-ons for Sugar Calendar you may find helpful:
You can also integrate with Zapier to connect with thousands of 3rd party tools and services.
Now that you know more about Sugar Calendar, let’s dive into the tutorial.
Follow the easy steps below to learn how to make a calendar in WordPress. We promise the steps are easy to follow, and it won’t take long to get up and running.
The first step is to install the Sugar Calendar plugin, so go to the Sugar Calendar website and click Let’s Get Started. From there, you can choose your pricing plan and follow the checkout steps to buy the plugin.
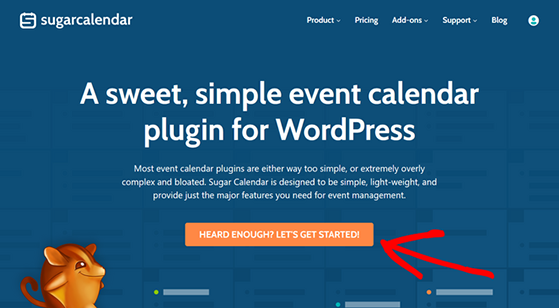
Sugar Calendar is a lightweight WordPress event calendar plugin perfect for beginners. It offers a free version of its calendar plugin via the WordPress.org plugin repository. However, for this guide, we’ll use the premium version, which has more advanced features than the free plugin.
Next, you’ll need to install and activate the Sugar Calendar plugin on your WordPress website. If you need help with this, you can follow this handy tutorial on how to install a WordPress plugin.
Upon activation, go to the Calendar » Settings page from your WordPress dashboard. In this area, you can enter your license key, which you can find on the Sugar Calendar website in your account area.
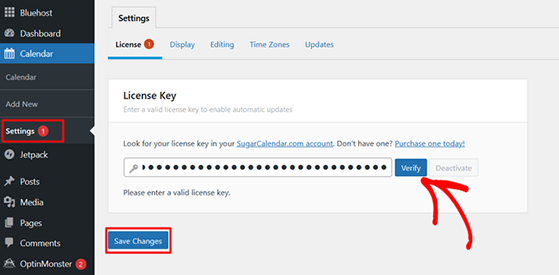
Now go ahead and click the Verify button to save your license details. You’re now ready to make your first calendar.
To create your first calendar, click on the Calendar icon in your WordPress admin sidebar and click the Calendar heading. On the next screen, you’ll have the option to click either the Events or Calendar tabs.
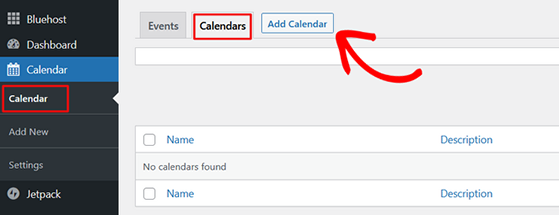
Click on the Calendar tab, then select the Add Calendar button to make a new calendar.
Now you’ll see a popup where you can add your calendar details. For instance, you can enter a name, a slug (the URL-friendly version of the name), and a calendar description.
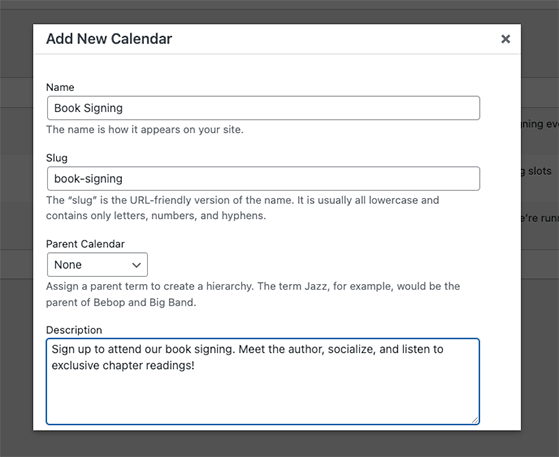
You can also click the dropdown menu to choose a parent calendar. Since this is our first calendar, you can ignore that setting for now.
If you scroll further down, you can choose a custom calendar color. It’s a helpful way to color-code your calendars if you plan to have multiple calendars on your site.
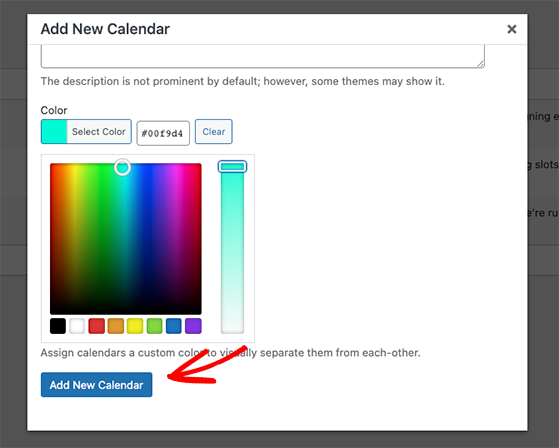
After choosing a color, click the Add New Calendar button to save the details.
Once you’ve made a calendar, you can start adding events for website visitors. This makes it easy to display upcoming events in WordPress without any extra setup.
To add events to your new calendar, click the Events tab and the Add Events button.
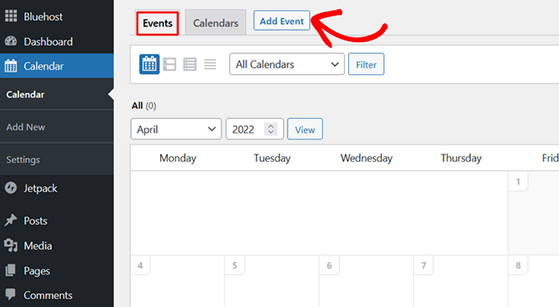
On the next screen, you’ll see the event editor, where you can enter the details for individual events.
Start by entering an event name at the top of the screen.
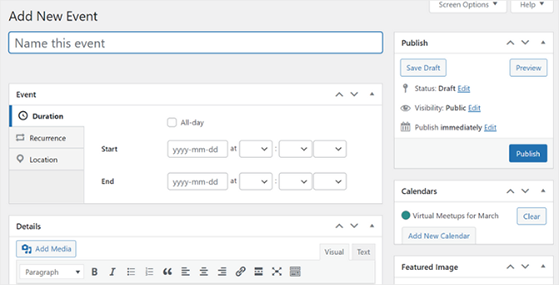
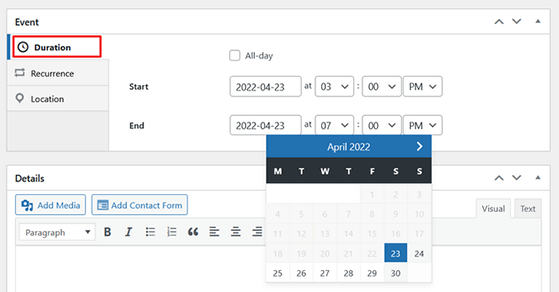
After that, you can select the event date, single or multiple days, and choose the start and end times. Additionally, you can enable the All-day checkbox for all-day events such as recurring holidays.
If you’d like the event to repeat weekly or monthly, click the Recurrence tab. From there, you can choose how often the event should repeat (Daily, Weekly, Monthly, or Yearly) and choose an end date.

You can also leave the end repeat date as Never.
In the Location tab, you can enter information about your event’s location. For example, you can add the address of the event venue for in-person events or add a webinar invite or zoom link for virtual events.
Next, scroll to the Details section and enter more information about your event. This is the perfect place to get people excited about your event and encourage them to attend.
For example, you can talk about some of the following event details:
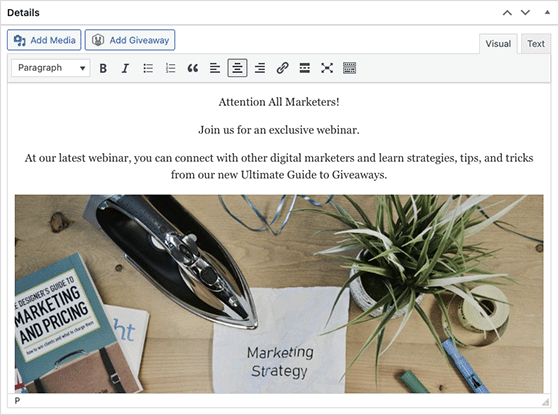
You can also add photos, videos, and a featured image to make your event page more appealing.
Once you’ve finished adding your event details, you can choose a calendar to add the event to on the right side of the screen.
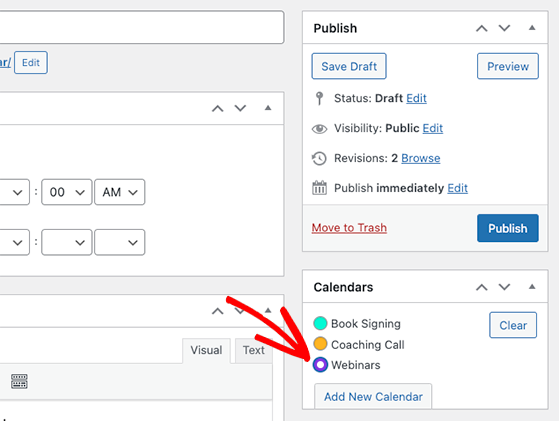
Then, you can click the Publish button to add the event to your calendar. Repeat this step to add as many events as you’d like.
Now you’re ready to add the calendar to your WordPress posts or pages.
With Sugar Calendar, you can add your calendar to a WordPress page, posts, custom post types, or a sidebar widget, using the built-in shortcode.
For this guide, we’ll show you how to add the calendar to a new WordPress page.
First, navigate to Pages » Add New and enter a page title. Then click the plus icon to add a new WordPress block and add the Shortcode block to the page.
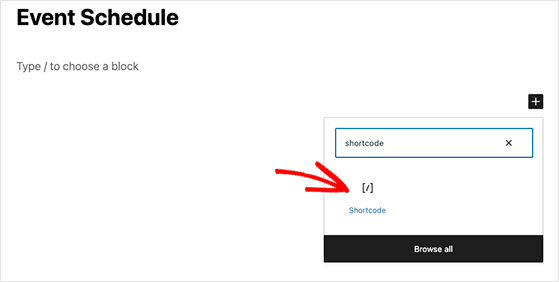
Next, copy this shortcode: [sc_events_calendar] and paste it into the Shortcode block.
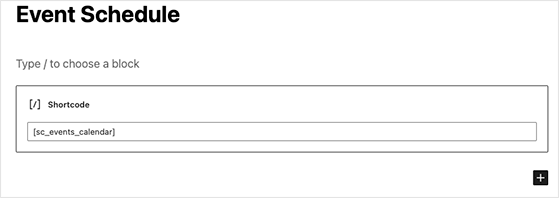
After clicking Publish, you can preview the page and see your events calendar in action.
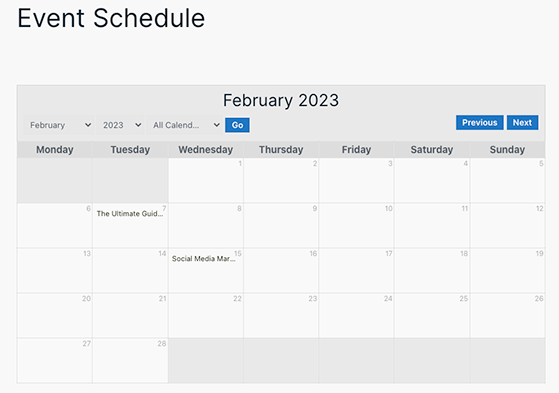
Sugar Calendar will automatically adjust the calendar styling to match your current WordPress theme. That means your calendar will always look consistent with the rest of your website.
Website visitors can easily select a calendar view and the date and month from the dropdown menus.
Additionally, they can click individual events to see the event details.

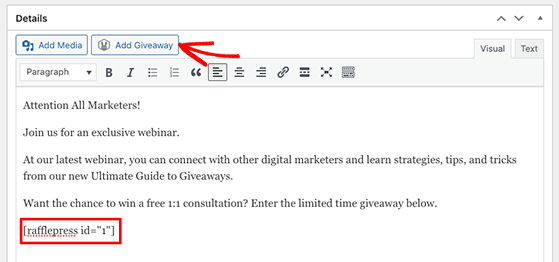
As you can see from the event details in this example, I used RafflePress to promote the event with a giveaway.

To do that, you can click the Add Giveaway button inside the event editor screen.
Congratulations, your event management calendar is now live on your WordPress website!
I hope you found this tutorial on how to make a calendar in WordPress helpful.
You might also like the following guides and tips:
If you liked this article, please subscribe to our YouTube Channel for RafflePress video tutorials. You can also find us on Twitter and Facebook.
Disclosure: Our content is reader-supported. This means if you click on some of our links, then we may earn a commission. We only recommend products that we believe will add value to our readers.
Copyright © 2024 SeedProd LLC. RafflePress® is a registered trademark of SeedProd LLC