How to Add a Contact Form in WordPress: 6 Easy Steps
 John Turner
 John Turner
Tired of people struggling to contact you on your website? Whether you’re trying to get more leads, offer support, or just stay connected, adding a contact form is one of the easiest ways to open that line of communication.
In this beginner-friendly guide, I’ll show you how to add a contact form in WordPress step by step, no coding required. You’ll learn how to set it up, customize it, and start getting messages right away.
Quick Summary:
- Why Add a Contact Form? – Learn why every site needs a contact form for leads, support, and better user experience.
- Best Contact Form Plugins – Compare popular options like WPForms, Contact Form 7, and Ninja Forms.
- Step-by-Step: Add a Contact Form in WordPress – Follow the full tutorial to build and publish your form with WPForms.
- Advanced Features – Use conditional logic, multi-page forms, and spam protection to improve results.
- Creative Ways to Use Forms – Run surveys, schedule bookings, offer customizations, and more.
- Track Form Conversions – Use MonsterInsights to measure form performance and optimize conversions.
- Common Contact Form Mistakes – Avoid issues like no email alerts, spam submissions, or over-complicated forms.
- Best Form Placement Ideas – Discover where to place your form for maximum visibility and engagement.
- FAQ – Quick answers to common questions about WordPress contact forms.estions.
Before diving in, let’s explore why your WordPress website needs a contact form.
Why Your WordPress Website Needs a Form
Forms are really important for any WordPress website. They’re like a bridge connecting you and your visitors, making it easier to talk to each other:
- Get More Leads: Forms are great for collecting leads. Over 84% of marketers use forms to get leads, and 49.7% say forms are their best tool for doing so. Plus, using online forms is 67% cheaper than traditional advertising (WPForms).
- Easier Communication: Forms give people a simple way to reach you without digging around for your email or social media. This makes them happy and builds better connections.
- Learn About Your Audience: Forms help you gather useful information about your visitors, like their age, what they like, and what they think of your site. This helps you improve your marketing and make your website better.
- Happy Visitors: Well-designed forms make signing up for emails, asking for a price quote, or getting help easier. This makes users like your site more and stick around longer.
- Better Quality Leads & More Customers: More than 28% of marketers say forms help them find better-quality leads (HubSpot). This is important because forms are meant to help turn visitors into paying customers.
Choosing the Best Contact Form Plugin for WordPress
When it comes to adding a contact form to your WordPress site, you’ll find several free and paid plugins available. But with so many options, how do you choose the right one for your needs?
Luckily, I’ve been able to test many solutions over the years, so can recommend some popular solutions. Let’s compare some of the most popular contact form plugins and highlight the key features you should look for.
My Pick: I personally use WPForms because it’s beginner-friendly and full of powerful features. It’s perfect whether you need a basic form or something more advanced.
What to Look for in a Form Plugin
When choosing a contact form plugin, keep an eye out for these essential features:
- Easy-to-Use: Pick a plugin with a drag-and-drop builder. This makes creating forms simple, even if you’re not tech-savvy.
- Customization Options: Your plugin should let you easily change how your forms look to match your website.
- Mobile-Friendly Design: Make sure forms work well on all devices, including phones and tablets.
- Spam Protection: Look for features like CAPTCHA to stop spam messages.
- Email Alerts: The plugin should tell you when someone fills out a form. It’s best if you can customize these alerts.
- File Uploads: If you need users to send you files, make sure the plugin allows this.
- Connects with Other Tools: It’s helpful if the plugin works with email marketing services, CRM tools, or payment systems you already use.
- Smart Forms: Look for ‘conditional logic’ that can show or hide questions based on previous answers.
- Multi-Page Forms: For longer forms, the ability to split them into pages can make them easier to fill out.
- Form Tracking: Some plugins let you see how well your forms are performing.
Personally, I’m a fan of WPForms because it’s both easy to use and has lots of features. Check out our WPForms Review for a more detailed overview.
But the best plugin for you depends on what you need and how comfortable you are with technology. Try a few different options to see which one you like best.
Free: Download Our Giveaway Playbook
Templates, prize ideas, and promotion strategies in one guide.
How to Add a Contact Form in WordPress
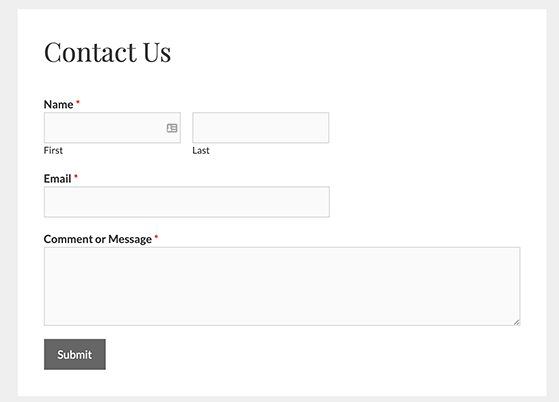
First, let’s look at how to add a simple contact form to WordPress. I’ll show you how to create a form similar to this example using WPForms:
Step 1. Install the Contact Form Plugin on Your Site
Click here to get started with WPForms and download the plugin to your computer. Then, go ahead and install and activate the plugin on your website.
If you need help with this step, see this step-by-step guide to install a WordPress plugin. Once you’ve done that, move on to the next step.
Step 2. Create a Custom Contact Form In WordPress
Now that WPForms is activated on your website, it’s time to create a new contact form.
From your WordPress dashboard, click the WPForms menu in the left-hand panel and click Add New.

This opens the WPForms form builder, which offers various form templates to choose from and customize. Start by choosing a form name. This can be anything that helps you identify it quickly in WordPress.
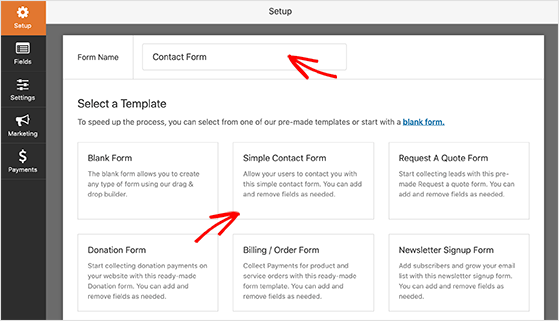
Now hover your mouse over and select the Simple Contact Form template, then click the button labeled “Create a Simple Contact Form.” This will open the template in the form builder, where you can add form customizations.
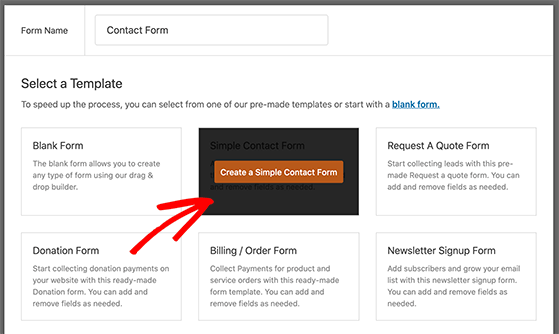
The Simple Contact Form template automatically fills your form with all the form field labels you’re likely to need, including the first and last name fields, subject line, form email, and message fields. It also lets you change the button text.
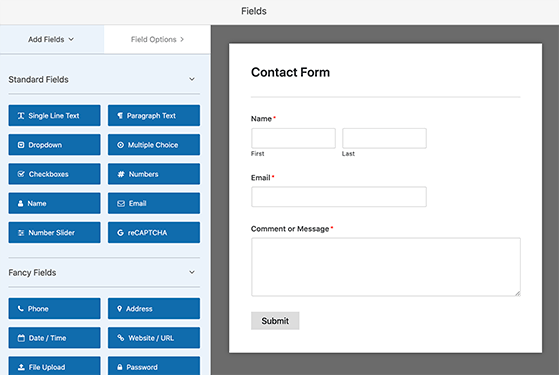
You can easily rearrange the fields by clicking, dragging, and dropping them to a different place. You can add extra fields to your form by selecting one from the left-hand panel and dragging it over to your form on the right.
You can also include custom CSS classes if you want further customizations.
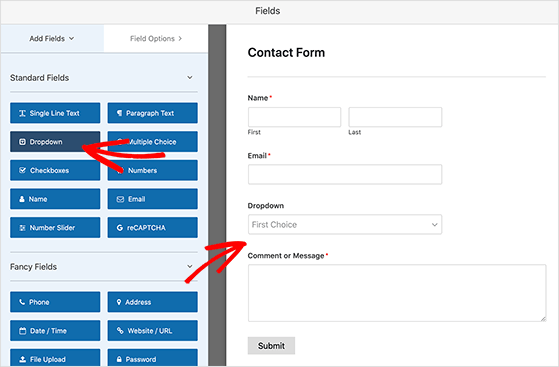
When you’re happy with the appearance of your form, click the Save button at the top-right corner of your screen.

Step 3. Configure Form Notifications
Now that you’ve created your contact form, you need to configure your form notifications. Form notifications are essentially automatic responses or messages that get triggered when a user fills out and submits your contact form; they’re key to keeping you updated about form activity on your site.
To do this, navigate to contact form settings and click the Notifications tab.
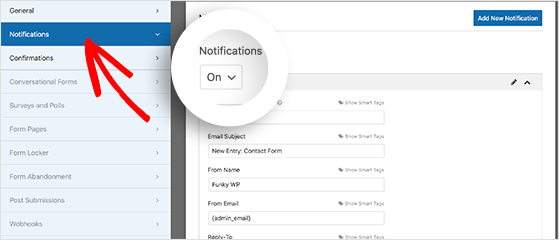
Form notifications are emails you’ll receive when someone fills in and submits your contact form.
The default notification settings have email notifications turned on. So, if you don’t want to get an email every time someone submits a form, choose Off from the dropdown menu.
Once you’ve set up your basic form notifications, it’s a good idea to customize the email subject line and message. This will improve the experience for your visitors and keep you in the loop.
For example, you can customize the information included in email notifications with smart tags. However, the default tags are just what you need for a simple contact form.
See the WPForms documentation to learn more about smart tags.
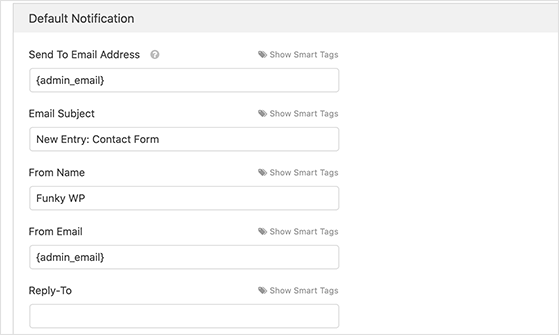
With your notifications configured, click Save and move on to the next step.
Step 4. Configure Your Confirmation Messages
For this step, we’ll look at your contact form confirmation messages. Users will see these immediately after clicking the submit button on your website. You can find the confirmations section by clicking Settings » Confirmations.
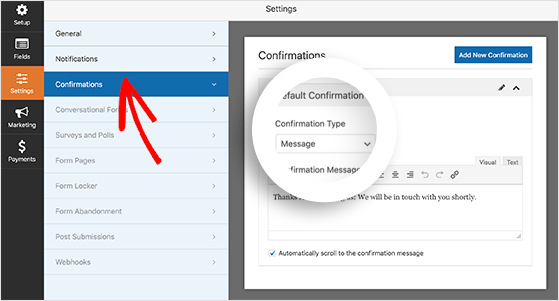
Upon submitting their contact form, users will see the ‘Message’ default confirmation type.
WPForms comes with a simple confirmation message ready to go. You can easily customize it by writing your message in the text editor.
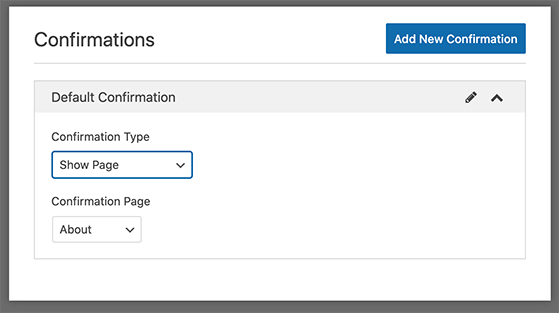
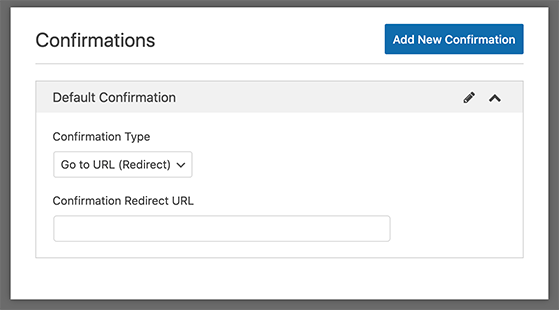
Besides the Message confirmation type, you can select two other confirmation types from the dropdown menu: Show Page and Go to URL (Redirect).
After submitting a form, the Show Page confirmation type shows users a specific page on your website.
With the Go to URL (Redirect) option, you can redirect users to a page on a different website when they complete the form.
After choosing a confirmation type, click Save. You’ve now successfully created a form in WordPress.
Now it’s time to embed your form on your WordPress site! Keep reading to learn the 2 key ways to add your contact form to your WordPress website.
Step 5. Add The Contact Form to Your Website Contact Page
The first method we’ll use is to add your form to a page.
Creating a contact page with your form offers a central location for visitors to reach out, increasing user friendliness and promoting seamless communication—a best practice for efficient and effective website management.
You can edit the page if you already have a contact page instead.
To create a new page in WordPress, navigate to Pages » Add New. We’ll use the WPForms WordPress block for this step.
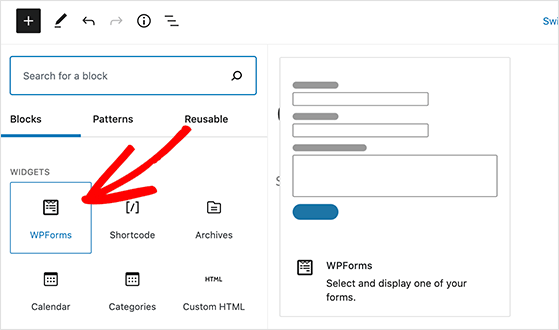
To add the WPForms block to your page, click the plus (+) icon in the top menu and scroll down to the Widgets section.

Then find the WPForms WordPress block and click it to add it to the page editor.
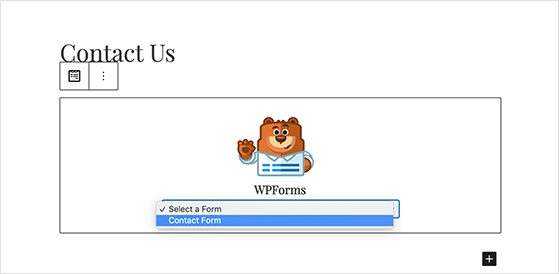
The WPForms block will now appear on the page. Click the dropdown menu and select the contact form you created earlier.
Your contact form will now appear on your page with a preview of its appearance.
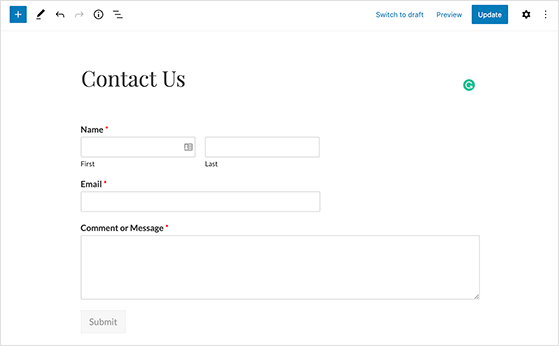
You can now save or publish your page. Here’s how the form looks on a contact page after publishing.
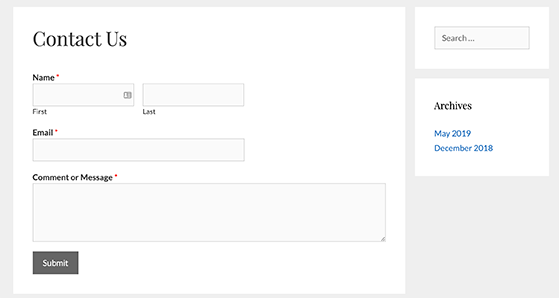
As you can see, it works with your WordPress theme to create a consistent and professional look.
WPForms also offers a shortcode for embedding your form. You can copy the contact form shortcode by visiting WPForms » All Forms and pasting it into any WordPress post or page.
Step 6. Add a WordPress Contact Form to Your Sidebar
Another way to publish your contact form in WordPress is to add it to your website’s sidebar area. This ensures the form is accessible, making it easier for visitors to get in touch with you, irrespective of the page they’re browsing on your site.
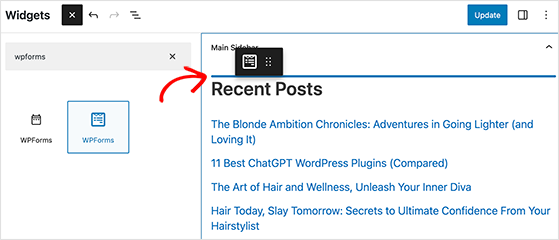
From your WordPress admin area, navigate to Appearance » Widgets. Now click the plus (+) icon to add a new block and search for ‘WPForms.’
When the WPForms block appears, drag it over to your sidebar.
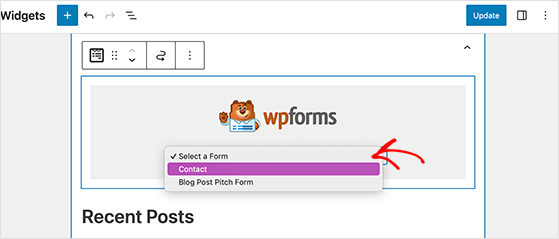
Now click the dropdown menu and choose the form you created earlier. The form will automatically appear in the sidebar.
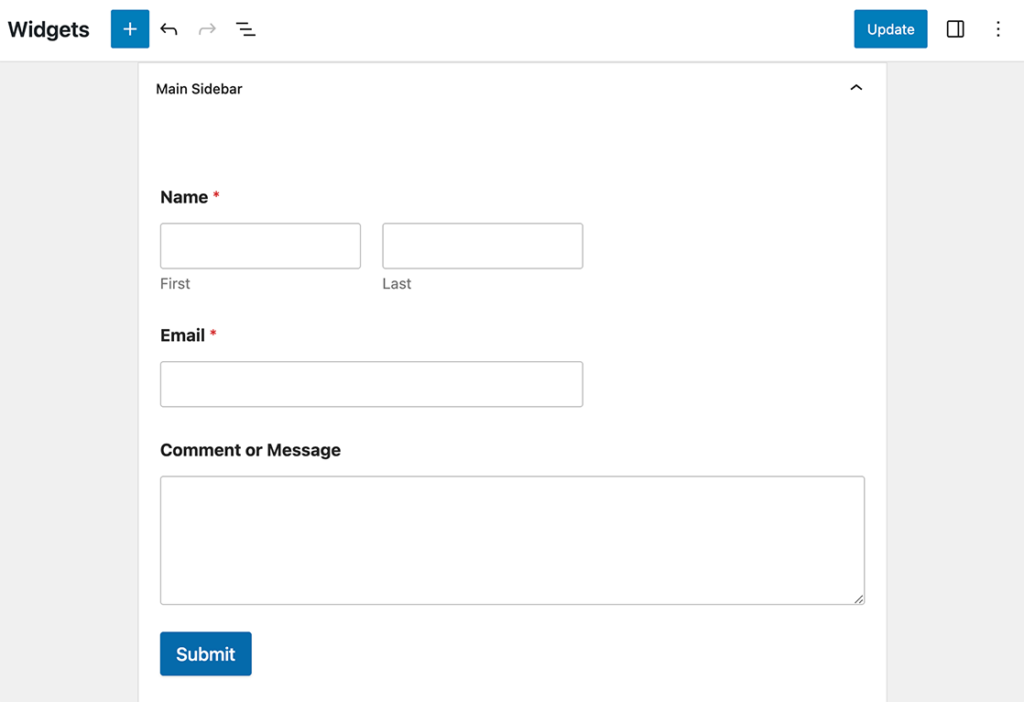
Remember to click Update to save your changes.
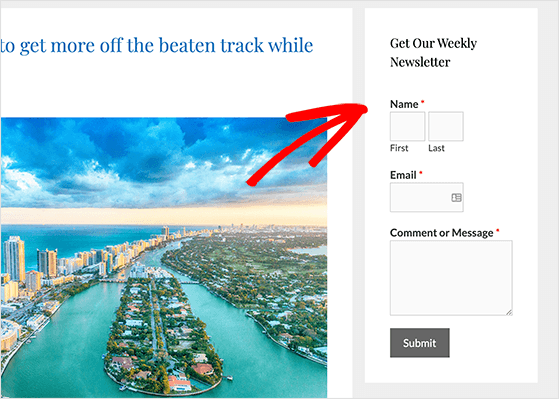
When you navigate to the front of your website, you’ll see your contact form in your chosen sidebar.
Embedding the Form in Other Places on Your Website
Your sidebar is a great place for your contact form, but it’s not the only option. Here are some other ideas to get your form noticed and make it easy for people to reach out:
The Footer
Add your form to the footer of your website, and it’ll be there on every single page. That makes it super simple for visitors to get in touch, no matter where they are on your site. You can usually add it using WordPress widgets, just like with the sidebar.

Right Inside Your Content
Do you have a blog post or page about a specific product or service? Pop your contact form right inside the page. This makes it super convenient for people with questions about that specific thing to get in touch.
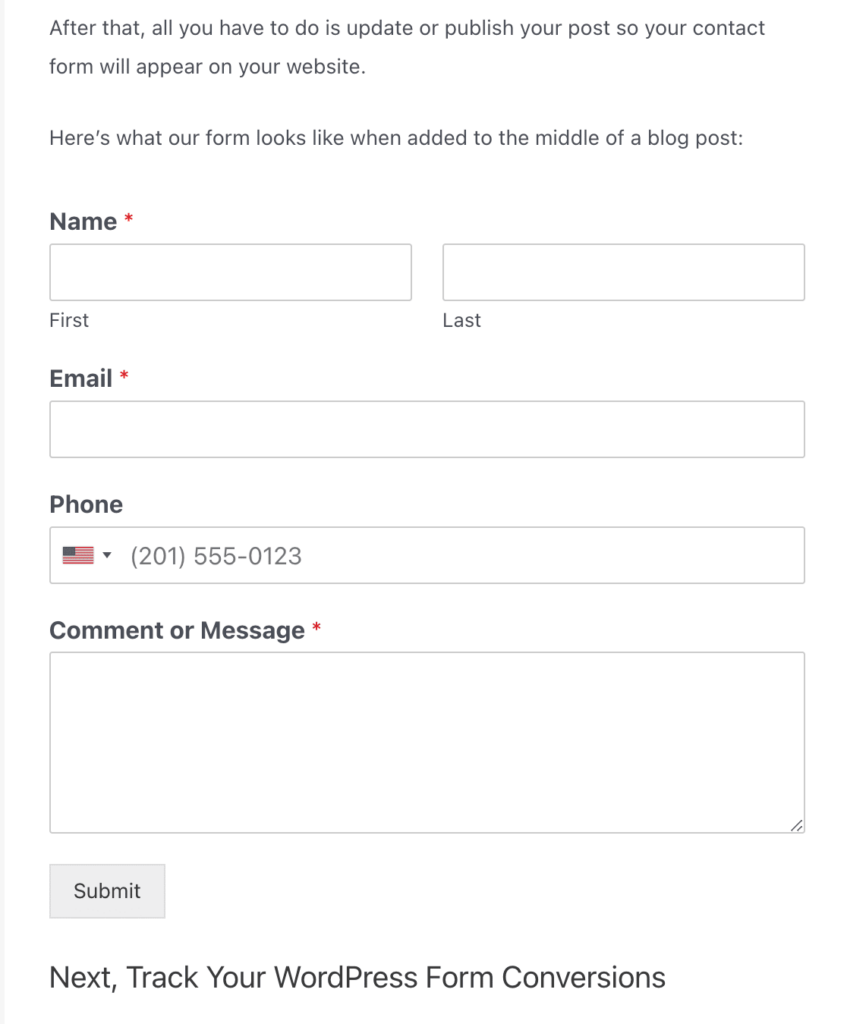
WPForms makes it easy to add your form anywhere using a block or some shortcode. Try out a few placements and see where your form gets the most attention – this can help you get even more people using it.
Advanced Contact Form Features
There’s no denying that a basic contact form serves its purpose, but when you take advantage of more advanced features, you can truly transform the user experience.
Conditional Logic
Conditional logic adapts the questions asked on your contact form based on the user’s previous answers. It creates a customizable and engaging experience for your users, helping you gather more relevant information.
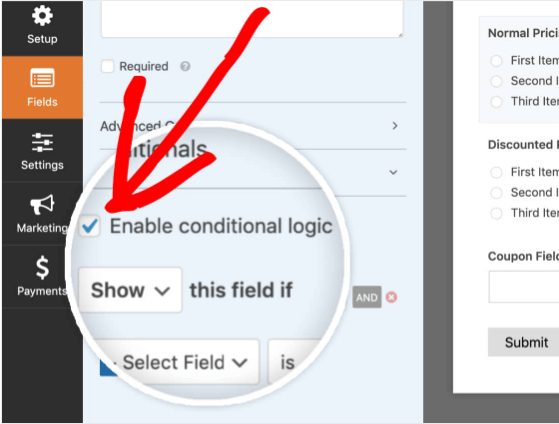
You can enable conditional logic by clicking the fields tab and checking ‘Enable conditional logic’ on any form field. Then, you can edit the conditions that dictate when to display certain fields.
Multi-Page Forms
Think about it: if you’re faced with a form that looks too complex or demanding, would you complete it? Most likely not. So, why should you expect your users to do so?
Multi-page forms are essentially long forms that are broken down into smaller, more manageable sections or “pages.” These pages are displayed sequentially, one at a time, making the overall form feel less overwhelming and improving the user experience.
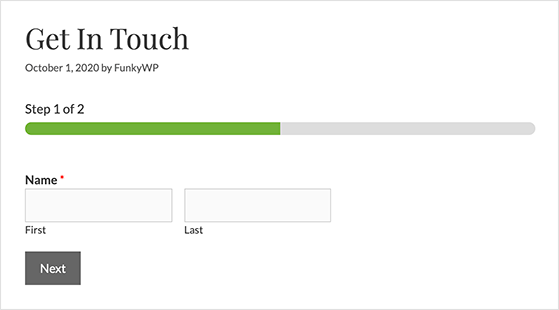
Think of it like reading a book instead of a single, dense paragraph. Each page focuses on a specific set of questions or information, making it easier for users to complete the form without feeling intimidated.
You can split your form into multiple pages automatically by dragging and dropping the ‘Page Break’ field inside the form builder.
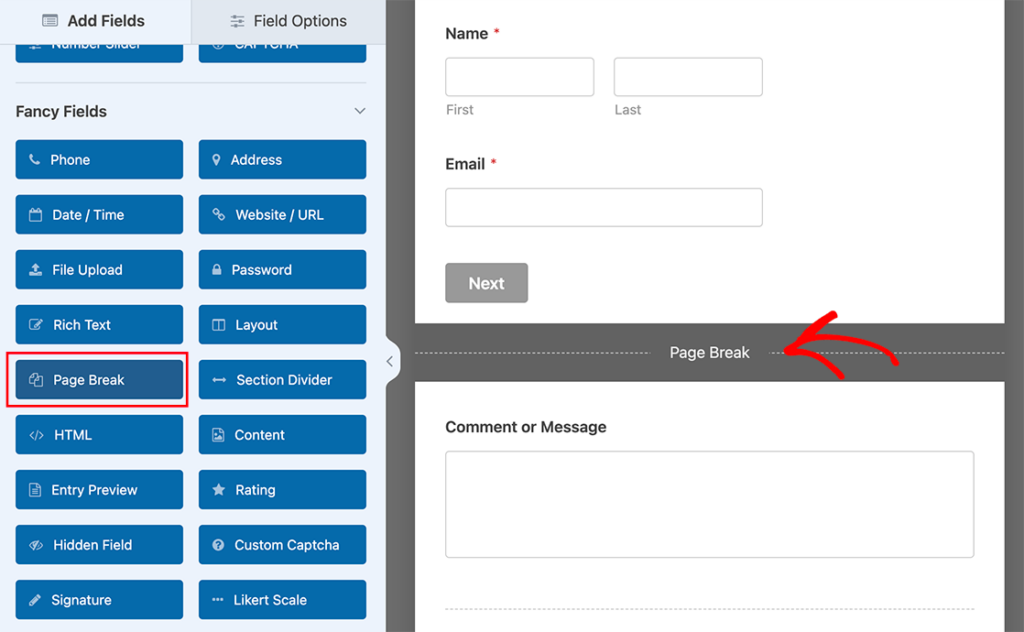
For details on how to set this type of form up, see our guide on how to create a multi-step form in WordPress.
File Upload Field
Sometimes, you may need the user to provide documents or materials. A file upload field allows users to attach files to their form submission—images, documents, audio files—you name it.
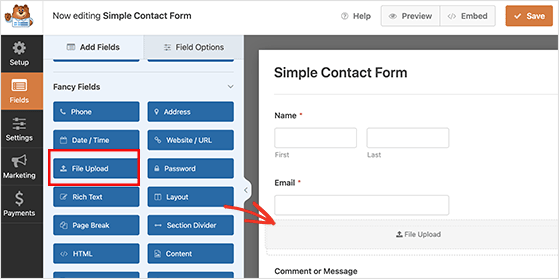
Just ensure you limit the size and type of files to prevent misuse.
Captcha for Preventing Spam
No one likes spam. No, we’re not talking about the canned meat variety but rather those meaningless, robotic submissions sent with the purpose of creating disruption.
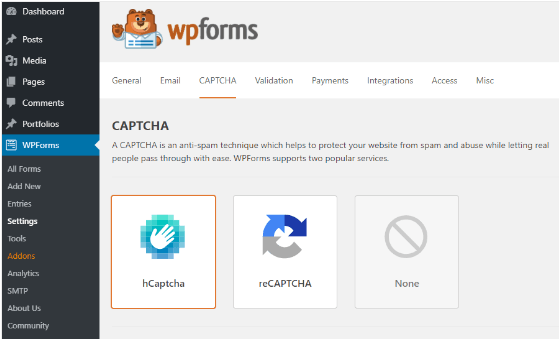
Adding a Captcha to your contact forms can help combat this.
You can seamlessly add all of these features into your WordPress Contact Form. They will not only enhance your user’s experience but also help you gather more useful and relevant data.
For more details, see our guide on how to stop spam form submissions.
Creative Ways to Use Contact Forms
Contact forms are great for collecting basic info, but they can do so much more. Here are a few ideas to help you get the most out of your forms:
- Get Feedback: Use forms to run surveys or polls. This lets you hear from your audience, understand what they like, and get ideas for improvement.
- Simplify Bookings: If you offer services, use a form to take client quotes or schedule appointments. It saves everyone time.
- Offer Customization: For online stores, let customers use a form to request special product changes or personalization.
- Manage Events: Use a form to handle event sign-ups, collecting all the details you need for a smooth experience.
- Build Your Mailing List: Add a simple newsletter signup option to your forms to help grow your email list.
These are just a few ideas. With some creativity, forms are powerful ways to improve your website and boost visitor engagement.
Tracking Your WordPress Form Conversions
After adding a contact form to WordPress, you’ll want to see how well your forms perform. Tracking form conversions is crucial in improving your site’s performance because it provides insights into visitor behavior, allowing you to optimize your form design, user journey, and website strategy for engagement and conversions.
The easiest way to track form conversions in WordPress is with MonsterInsights.

MonsterInsights is one of the best Google Analytics plugins for WordPress, and it includes a powerful form-tracking add-on that tracks form conversions automatically.
Moreover, MonsterInsights is easy to set up and takes only a few clicks to get started. Just install MonsterInsights, and it will start tracking right away. It’s also fully compatible with WPForms and other form plugins for WordPress.
Check out this guide to learn how to track WordPress form conversions.
Common Contact Form Mistakes to Avoid
Even though adding a contact form is easy with the right plugin, there are a few common mistakes that can cause problems or reduce your results. Here’s what to watch out for:
- Not testing your form: Always test your form after adding it to make sure it sends messages and displays correctly.
- Forgetting confirmation messages: Set up clear form confirmations so users know their message was sent.
- No spam protection: Add reCAPTCHA or honeypot fields to prevent spam bots from flooding your inbox.
- Asking for too much info: Long or complex forms can scare people away. Keep it simple unless you really need more details.
- Missing email alerts: Make sure notifications are enabled so you never miss a new message.
Most of these issues are easy to avoid, especially if you use a beginner-friendly plugin like WPForms that includes smart defaults.
Best Places to Add Your Contact Form
Where you place your contact form can make a big difference in how many people use it. Here are some smart places to add your form depending on your goals:
- Contact Page: This is the most common spot — create a dedicated page with your form and link to it from your site menu.
- Sidebar: Display your form site-wide so visitors can contact you from any page.
- Footer: Keep it accessible at the bottom of every page — great for support forms or general inquiries.
- Landing Pages: If you’re promoting something, embed a form right on the page to capture leads or questions.
- Product Pages: Let users ask pre-sale questions without having to leave the page.
- Blog Posts: Add a contact form at the end of content to encourage feedback or client inquiries.
Want to create a high-converting landing page with a built-in form? Check out our guide on how to create a landing page in WordPress.
WordPress Contact Form Frequently Asked Questions
How do I get my contact form to send emails?
To get your contact form to send emails, go to WPForms » Settings » Notifications. Make sure the “Send To Email Address” field is correct. If your emails still don’t arrive, try using a free SMTP plugin to fix email deliverability.
How do I protect my contact form from spam?
To get your contact form to send emails, go to WPForms » Settings » Notifications. Make sure the “Send To Email Address” field is correct. If your emails still don’t arrive, try using a free SMTP plugin to fix email deliverability.
What are some of the most common problems with contact forms?
Some of the most common problems with contact forms include:
- Forms not sending emails
- Forms not displaying correctly
- Forms being filled out by spam bots
How can I troubleshoot problems with my contact form?
If you’re having problems with your contact form, there are a few things you can do to troubleshoot the issue.
First, check the email settings for your contact form plugin. Make sure that the email address you have specified is correct and that the plugin is configured to send emails. Second, check the display settings for your contact form. Make sure that the form is displaying correctly in all browsers.
Finally, check for spam bots. If you are seeing a lot of spam messages in your inbox, you may need to add a CAPTCHA or honeypot field to your form.
How to add contact form in WordPress Elementor free
While the free version of Elementor doesn’t include a contact form feature, you can easily add a contact form using the free WPForms Lite plugin. Simply install and activate WPForms Lite, then use the WPForms widget to drag and drop your form into your Elementor page or post.
Why is my WordPress contact form not working?
The most common reasons are incorrect email settings, plugin conflicts, or missing form confirmations. Try testing your form with different browsers, updating your plugin, and using SMTP to fix email issues.
Can I add a contact form without a plugin?
You technically can by adding custom HTML and PHP, but it’s not beginner-friendly. Using a plugin like WPForms is much faster, safer, and doesn’t require any coding.
Which is the best free contact form plugin for WordPress?
WPForms Lite is the best free contact form plugin for beginners. It offers drag-and-drop form building, spam protection, and ready-made templates with no code required.
Next, Build More WordPress Forms
And there you have it.
You now know how to add a contact form in WordPress. We hope this article covers everything for beginners.
If you’re struggling with getting recaptcha working on your site, you may find out guide on how to fix recaptcha not working helpful.
Thanks for reading, and if you liked this article, don’t forget to follow us on YouTube, Twitter, and Facebook for more great WordPress tutorials to grow your business.
